Author: Miyabi

  • Best Japanese Kitchen Gadgets on Amazon 2026: Top 5 Must-Have Tools

    Best Japanese Kitchen Gadgets on Amazon 2026: Top 5 Must-Have Tools

    Why Japanese Kitchen Gadgets Are Worth Every Penny

    Japan has a reputation for producing some of the world’s most refined kitchen tools. From perfectly engineered rice cookers that have been refined over 70 years, to hand-forged knives that professional chefs around the world swear by, Japanese kitchen gadgets represent a philosophy: every meal deserves the best tool for the job.

    Whether you’re an expat living in Japan looking to upgrade your kitchen, or a Japan enthusiast abroad who wants to cook authentic Japanese food at home, this guide covers the 5 best Japanese kitchen gadgets you can buy on Amazon right now — all verified in stock and shipped internationally.

    We’ve focused on products that are genuinely Japanese in design and function, available on Amazon.com and Amazon Japan, and worth the investment for everyday use.

    The 5 Best Japanese Kitchen Gadgets on Amazon 2026

    1. Zojirushi NW-JAC10 Induction Heating Rice Cooker — The Gold Standard

    If there’s one Japanese kitchen gadget that will genuinely change how you cook, it’s the Zojirushi IH rice cooker. Zojirushi has been making rice cookers since 1974, and their NW-JAC10 is the sweet spot of the lineup: induction heating (far superior to regular heating plate models), a 5.5-cup capacity perfect for families, and dedicated settings for white rice, sushi rice, brown rice, porridge, and even GABA rice.

    What makes it special? The spherical inner pot distributes heat evenly to every grain. The result is rice with a fluffy, slightly sticky texture that’s almost impossible to achieve with Western rice cookers. Expats in Japan consistently call it the single best kitchen purchase they’ve made.

    The NW-JAC10 keeps rice warm for up to 12 hours without drying it out, and the delay timer means you can wake up to freshly cooked rice every morning. The LCD menu is fully in Japanese, but the functions are intuitive — and there’s an English manual included.

    Quick Specs
    Capacity: 5.5 cups (1L) | Heating: IH (Induction) | Presets: 8 rice types + porridge | Keep Warm: 12 hours | Weight: 4.4 kg | Power: 120V (US model available)
    ✅ Pros: Even IH heating produces restaurant-quality rice. Multiple grain presets. Delay timer. Keeps rice warm perfectly. US voltage model available on Amazon.com.
    ❌ Cons: Expensive compared to basic models. Japanese LCD (English functions still usable). Heavy at 4.4 kg.

    2. Iwachu Cast Iron Tetsubin — The Authentic Japanese Tea Kettle

    The Iwachu tetsubin (鉄瓶) is one of Japan’s most iconic kitchen objects. Made in Morioka, Iwate Prefecture — which has been producing cast iron crafts for over 900 years — these hand-crafted kettles are built to last a lifetime and improve with use.

    The iron gradually seasons the water as it heats, releasing beneficial iron ions while giving the water a noticeably smoother, rounder taste. Japanese tea ceremony practitioners and specialty coffee enthusiasts both prize tetsubin-boiled water for this reason.

    The Iwachu Arare pattern (the classic bumpy exterior) is the most popular design — the bumps increase surface area for faster heating and give it the traditional Japanese aesthetic. These are genuinely used in Japanese homes every day, not just decorative pieces.

    Quick Specs
    Capacity: 1.2L | Material: Cast iron | Interior: Uncoated iron (seasons over time) | Compatible: Gas, IH, electric | Origin: Morioka, Japan
    ✅ Pros: Lasts decades with proper care. Improves water taste. Authentic Japanese craftsmanship. IH compatible. Beautiful aesthetic.
    ❌ Cons: Requires seasoning and care to prevent rust. Heavier than stainless kettles. Slow to heat. Pricier than stainless alternatives.

    3. Global G-2 Classic Chef’s Knife 8″ — The Professional’s Choice

    Global knives from Yoshikin (Niigata Prefecture) revolutionized professional kitchens worldwide when they launched in 1985. The G-2 8-inch chef’s knife remains their best seller and the benchmark against which all Japanese kitchen knives are measured outside Japan.

    What makes Global different: the entire knife — blade and handle — is made from a single piece of high-hardness CROMOVA 18 stainless steel (56 HRC), eliminating the crevices where bacteria can hide. The blade is sharpened to a 15° angle (vs Western knives’ 20-22°), giving it superior cutting performance that stays sharp longer.

    The dimpled handle provides secure grip even with wet hands. Many professional chefs in restaurants outside Japan use Global knives because they combine Japanese sharpness with easier maintenance compared to traditional Japanese single-bevel knives.

    Quick Specs
    Blade: 20cm (8″) | Steel: CROMOVA 18 stainless (56 HRC) | Edge: 15° double bevel | Handle: Hollow stainless with dimples | Weight: 165g | Made in Japan
    ✅ Pros: One-piece stainless — hygienic and durable. Exceptionally sharp 15° edge. Lightweight and balanced. Dishwasher safe (though hand wash recommended). Available worldwide.
    ❌ Cons: Premium price. The thin blade can chip if used on bones. Requires a ceramic or water whetstone — regular pull-through sharpeners will damage it.

    4. Nakano Copper Tamagoyaki Pan — The Japanese Egg Pan

    The tamagoyaki pan (玉子焼き器) is the quintessential Japanese breakfast tool. This rectangular copper pan is used to make tamagoyaki — layered rolled omelette that’s a staple of Japanese bento boxes, sushi restaurants, and home breakfasts. Copper heats faster and more evenly than stainless or aluminum, giving you precise control over each delicate layer.

    Nakano’s copper tamagoyaki pan is lined with tin — the traditional Japanese approach that provides excellent non-stick properties without synthetic coatings, and it develops a natural patina that improves with use. The rectangular shape makes rolling easy, and the handle stays cool to the touch.

    Even if you never make traditional Japanese tamagoyaki, this pan is ideal for crepes, thin pancakes, French omelettes, and any recipe that benefits from precise, even heat distribution.

    Quick Specs
    Size: 18cm × 13cm (standard Japanese size) | Material: Copper with tin lining | Handle: Wood (stays cool) | Compatible: Gas only (not IH) | Made in Japan
    ✅ Pros: Superior heat distribution for delicate eggs. Natural tin lining — no synthetic non-stick coating. Develops a natural non-stick patina. Long-lasting with care.
    ❌ Cons: Gas only — not IH compatible. Requires careful washing (no soaking). Higher price than aluminum versions. Tin lining eventually needs re-tinning after many years.

    5. Nagatani-en Donabe Clay Pot — Japan’s Original One-Pot Cooking

    The donabe (土鍋) is Japan’s ancient clay cooking pot, and Nagatani-en from Iga, Mie Prefecture makes the finest ones available. Iga clay is uniquely porous and heat-resistant — the same clay that samurai-era potters used — and Nagatani-en has been producing donabe there since 1832.

    The donabe is used for nabemono (hot pot dishes like sukiyaki and shabu-shabu), steaming rice to a fluffy perfection that rivals any electric rice cooker, slow-cooking soups and stews, and even baking bread. The porous clay absorbs water and releases it as steam during cooking, creating an incredibly moist cooking environment impossible to replicate in metal pots.

    Nagatani-en’s Hakeme model (with a characteristic brush-stroke exterior) is the most popular — it can go directly from fridge to stovetop without cracking, which is rare for clay pots. It’s an investment that lasts decades and becomes a kitchen centerpiece.

    Quick Specs
    Sizes: 6-inch (2 servings) to 11-inch (6+ servings) | Material: Iga clay | Compatible: Gas, IH (some models), electric | Origin: Iga, Mie Prefecture, Japan
    ✅ Pros: Unmatched moist-heat cooking. Genuinely traditional Japanese craftsmanship. Versatile — hot pot, rice, soups, steaming. Becomes more seasoned with use. Stunning tableware too.
    ❌ Cons: Requires seasoning before first use. Fragile if dropped. Slow to heat. Premium price for the genuine Nagatani-en brand.

    How to Choose: Quick Buying Guide

    For daily cooking convenience: The Zojirushi rice cooker is the single highest-impact purchase. If you eat rice even twice a week, the quality improvement is immediately noticeable.

    For tea lovers and slow mornings: The Iwachu tetsubin will transform your tea ritual. Pair it with quality Japanese green tea or matcha for the full experience.

    For serious home cooks: The Global G-2 chef’s knife is the best all-around kitchen upgrade. Once you cook with a properly sharp 15° Japanese blade, you won’t go back.

    For Japanese breakfast and bento: The copper tamagoyaki pan is a fun, specialized tool that produces results impossible with a regular frying pan.

    For entertaining and hot pot nights: A Nagatani-en donabe doubles as a stunning tableware centerpiece. Perfect for cold Japanese winters with friends around the table.

    Where to Buy Japanese Kitchen Gadgets

    All five products above are available on Amazon — both Amazon.com (ships internationally) and Amazon Japan (amazon.co.jp). Amazon Japan often has the best prices and the widest selection, but shipping outside Japan can be expensive for heavy items like the rice cooker and donabe.

    Amazon.com carries most of these through Prime — especially the Zojirushi (which has a 110V US model) and Global knives. The tetsubin and tamagoyaki pans are also well-stocked on Amazon.com through Japanese import sellers.

    You can also find these at Don Quijote (Donki), Tokyu Hands, and kitchen specialty stores like Kama-asa in Kappabashi (Tokyo’s kitchen district) if you’re shopping in Japan.

    📥 Japan Expat Starter Kit 2026

    Moving to Japan? Get our complete 60-page guide covering everything from banking and housing to daily life tips — including kitchen and shopping guides.

    📥 Get the Guide — $19

  • No Internet in Japan? Complete Fix Guide for Tourists & Expats (2026)

    No Internet in Japan? Complete Fix Guide for Tourists & Expats (2026)

    Why Your Phone Might Not Work in Japan (Even With a “Good” Plan)

    You land at Narita or Haneda, turn on your phone, and… nothing. Or worse — you have signal bars but no actual internet. Or your roaming charges are sky-high. Japan’s mobile network situation is excellent for locals but confusing for foreigners. This guide walks through every scenario, every fix, and the cheapest setup for 2026.

    The 4 Ways to Get Internet in Japan

    Before troubleshooting, it helps to know your options. There are four main ways tourists and expats get internet in Japan:

    Option 1: International Roaming (Your Home Plan)

    Simply using your existing phone plan in Japan. Most major carriers offer international day passes ($5–$15/day) or global plans. Pros: no setup needed. Cons: can be expensive for longer stays, sometimes throttled to 2G speeds after a data limit.

    Option 2: eSIM (Best for Tourists)

    Buy a Japan eSIM before you travel. Download it to your phone, activate it on arrival. Pros: fast, cheap (from ¥1,000 for 7 days), keep your home SIM active for calls. Cons: requires a compatible eSIM phone (iPhone XS or later, most modern Android flagships). Top providers: Airalo, Holafly, IIJmio.

    Option 3: Physical SIM Card

    Buy a Japan SIM at the airport or online. Insert and go. Pros: works on any unlocked phone. Cons: need to eject your home SIM (can’t receive calls on your normal number while in Japan unless you have two SIM slots).

    Option 4: Pocket WiFi Device

    A portable WiFi hotspot you rent. Pros: connect multiple devices, no phone compatibility issues. Cons: extra device to carry and charge, need to pick up/return at airport.

    Troubleshooting: My Phone Has No Internet in Japan

    Problem 1: Roaming Isn’t Enabled

    The most common fix. Many phones have data roaming disabled by default to prevent bill shock.

    iPhone fix: Settings → Mobile Data → Mobile Data Options → Data Roaming → ON

    Android fix: Settings → Connections → Mobile Networks → Data Roaming → ON

    Also check: Settings → Mobile Data → make sure mobile data is ON, not just WiFi.

    Problem 2: Your Phone is Carrier-Locked

    If you bought your phone directly from a carrier (AT&T, Verizon, EE, etc.) rather than unlocked, it may only work with their SIM cards. Japan’s networks (NTT Docomo, SoftBank, au) use different carrier agreements.

    Fix: Contact your carrier to unlock your phone before traveling. Most carriers unlock for free after your contract period. Once unlocked, Japanese SIMs and eSIMs will work.

    Quick check: Try inserting a different SIM (even a friend’s) and see if it connects. If it doesn’t, your phone is locked.

    Problem 3: Wrong APN Settings

    If you have a Japan SIM card but no internet, the issue is usually APN (Access Point Name) settings — the configuration your phone needs to connect to the carrier’s data network.

    Fix for iPhone: Many Japan SIMs install the APN profile automatically when you insert the card. If not, go to the carrier’s website and download their APN profile. Usually at: [carrier name] + “APN settings iPhone”.

    Fix for Android: Settings → Connections → Mobile Networks → Access Point Names → Add new APN → Enter the APN details from your carrier’s website.

    Common Japan SIM APN settings (IIJmio example):
    Name: IIJmio
    APN: iijmio.jp
    Username: mio@iij
    Password: iij
    Authentication: CHAP

    Problem 4: eSIM Not Activating

    You purchased an eSIM but it’s not connecting. Common causes and fixes:

    • QR code not scanned correctly: Settings → Mobile Data → Add eSIM → Use QR Code. Make sure you’re using a different device to display the QR (you can’t scan and display on the same phone).
    • Not yet in Japan: Some eSIMs only activate once you’re in Japan and your device registers on the Japanese network. Give it 10–15 minutes after landing.
    • APN not set: Same as above — check if an APN profile needs to be installed.
    • Phone too old: eSIM requires iPhone XS (2018) or later, or Android phones with eSIM support. Check your phone’s specs.
    • eSIM already used: Most travel eSIMs are single-use. If you’ve activated this eSIM before, it won’t activate again on a new phone. Contact the provider for a new QR code.

    Problem 5: Connected to WiFi But No Internet

    Your phone shows full WiFi bars but pages won’t load. This is usually a captive portal (login page) issue.

    Fix: Open your browser and try to navigate to any HTTP page (like http://neverssl.com). This should trigger the hotel/café/airport login portal. Complete the login and you’ll get access.

    If still nothing: Forget the network and reconnect. Check if the WiFi requires a voucher code from the front desk (common in hotels and ryokan).

    Problem 6: SIM Card Not Recognized

    Phone shows “No SIM” or “Invalid SIM” after inserting Japan SIM.

    Fix:

    1. Power off completely, remove SIM, reinsert, power on
    2. Check you have the right SIM size (nano/micro/standard) — Japan SIMs usually come with an adapter
    3. Make sure SIM is seated correctly — the gold contacts facing down on iPhone, facing up on most Android
    4. Try a different SIM tray orientation if there are multiple slots
    5. If still failing, try your home SIM — if that’s also not recognized, the SIM tray or reader may be damaged

    Problem 7: Very Slow Internet Despite Good Signal

    You have signal and data is technically working, but speeds are painful (like 0.5 Mbps). Causes:

    • Fair Use Throttling: Your Japan SIM or roaming plan has hit its high-speed data cap. Data continues at 200 kbps or lower. Check your plan’s data limit.
    • Network congestion: Happens at major events, busy stations (Shinjuku, Shibuya), and peak hours. Move a bit or wait a few minutes.
    • Wrong network band: Rarely, your phone might not support the 5G/4G LTE bands used by the Japanese carrier. Check your phone’s supported bands vs Japan’s carrier bands (Docomo uses B3, B19, B28; SoftBank uses B3, B8, B28; au uses B3, B18/B26).

    Fix: If throttled, buy more data or switch to a different plan. If band incompatibility, try a different SIM carrier.

    Public WiFi in Japan: What Works and What Doesn’t

    Free WiFi Hotspots That Work Well

    • 7SPOT (7-Eleven WiFi): Free, available in all 7-Eleven stores. Register once with email. 60 minutes per session, unlimited sessions.
    • Docomo WiFi / au WiFi / SoftBank WiFi: Available at major stations, malls, and tourist spots. Speed varies widely.
    • JR East Train WiFi: Shinkansen and many express trains now have onboard WiFi. Speed is usable for email/maps but not streaming.
    • Airport WiFi: Narita and Haneda have excellent free WiFi. Use it to set up your eSIM/SIM before leaving the airport.
    • Starbucks Japan WiFi: Reliable, fast enough for video calls. Works nationwide.

    WiFi That’s More Trouble Than It’s Worth

    • Japan Connected-free WiFi app: Requires registration. Works at some spots but inconsistent.
    • FREESPOT: Highly variable quality. Many require a Japanese-language registration process.
    • Hotel room WiFi: Often fine for browsing but may struggle with video calls. Use the hotel lobby if in-room is slow.

    The Best Internet Solutions for Japan by Trip Type

    Short-Term Tourist (1–2 weeks)

    Best option: eSIM. Get Airalo or IIJmio eSIM before you travel. 10GB for ¥3,000–¥5,000 is plenty for 2 weeks of maps, messaging, and light browsing. Keep your home SIM active for calls and 2FA messages.

    Long-Term Expat or Remote Worker

    Best option: Local SIM from IIJmio, Rakuten Mobile, or LINEMO. Monthly plans from ¥880–¥3,300 for unlimited or large data. Rakuten Mobile offers unlimited data for ¥3,278/month on their own network (note: rural coverage gaps).

    Traveling as a Group

    Best option: Pocket WiFi rental. Share one device among 3–5 people. Rent from Japan Wireless or Ninja WiFi at the airport. Around ¥300–¥600 per day for unlimited data. Return at the airport.

    No Smartphone (or Older Phone Without eSIM)

    Best option: Pocket WiFi, or a physical SIM from the airport (IIJmio, b-mobile, Docomo Data SIM). Bring a SIM tool to open the tray.

    Japan’s 5G Coverage Map (2026)

    Japan has excellent 4G LTE coverage essentially everywhere that people live or travel. 5G coverage as of 2026:

    • NTT Docomo: Best overall coverage including rural areas. 5G expanding rapidly.
    • SoftBank: Strong in cities, weaker in rural areas.
    • au (KDDI): Good city coverage, solid rural LTE.
    • Rakuten Mobile: 5G and 4G in urban areas, uses au network roaming in rural areas (data throttled on roaming).

    For most tourists visiting Tokyo, Osaka, Kyoto, and the main tourist trail, any provider works fine. If you’re doing rural hiking or visiting remote onsen, Docomo-based SIMs give the best coverage.

    Quick Fix Checklist: No Internet in Japan

    Run through this in order:

    1. ☐ Data roaming enabled? (Settings → Mobile Data → Data Roaming → ON)
    2. ☐ Mobile data enabled? (not just WiFi)
    3. ☐ Phone unlocked for international use?
    4. ☐ APN settings installed? (for physical SIM users)
    5. ☐ eSIM properly scanned and activated?
    6. ☐ Have you hit your data limit? (check carrier app)
    7. ☐ Try airplane mode ON for 30 seconds, then OFF
    8. ☐ Full phone restart (power off, wait 30 seconds, power on)
    9. ☐ Forget WiFi network and reconnect
    10. ☐ Try a different WiFi network (7-Eleven hotspot as backup)

    📚 JAPAN EXPAT STARTER KIT

    Stop Googling Everything.
    Get the Complete Guide.

    Banking · Health Insurance · Housing · Suica · Taxes · PayPay · Amazon Japan
    — all in one PDF, updated for 2026.

    📥 Get the Guide — $19

    30-day money-back guarantee · Instant PDF download

    🇯🇵 Travel & Life Essentials for Japan

    Hand-picked gear to make your time in Japan easier. Available on Amazon US & Amazon Japan.

    🔋 Portable charger

    A must for long days of sightseeing and photos.

    View on Amazon (US)View on Amazon Japan

    🔌 Travel plug adapter

    Japan uses Type A outlets. Bring the right adapter.

    View on Amazon (US)View on Amazon Japan

    🎧 Translation earbuds

    Real-time translation to talk without barriers.

    View on Amazon (US)View on Amazon Japan

    As an Amazon Associate, Japan Life Lab earns from qualifying purchases.

  • Japan ATM Problems 2026: Why Your Foreign Card Gets Rejected & Every Fix That Works

    Japan ATM Problems 2026: Why Your Foreign Card Gets Rejected & Every Fix That Works

    Why Does Japan Reject Foreign Cards at ATMs? (The Real Reason)

    You’re standing at a Japanese ATM, your debit card in hand, and the machine just spits it back out. Maybe it says “this card cannot be used” in Japanese, or the screen just returns to the menu without explanation. If this has happened to you, you’re not alone — it’s one of the most common frustrations foreign visitors and expats face in Japan in 2026.

    Here’s the truth: most Japanese bank ATMs are simply not configured to communicate with international payment networks. Many domestic ATMs only process cards on Japan’s proprietary banking networks (like MICS or Yucho), not Visa/Mastercard/Amex international networks. This has nothing to do with your account balance or credit score — the machine literally doesn’t know how to talk to your bank.

    The good news: there are reliable ATMs that work, clear workarounds, and digital solutions that make carrying a pile of yen optional. This guide covers everything.

    The ATMs That Actually Accept Foreign Cards in Japan (2026)

    1. 7-Eleven ATMs (Seven Bank) — Most Reliable

    Seven Bank ATMs inside 7-Eleven convenience stores are the gold standard for foreign card users in Japan. They accept cards from over 100 countries and support Visa, Mastercard, Maestro, Plus, Cirrus, American Express, UnionPay, and more. The interface switches to English (and multiple other languages) automatically when it detects a foreign card.

    Where to find them: Inside virtually every 7-Eleven in Japan. There are over 21,000 7-Eleven stores nationwide — you’re never far from one.

    Fees: Seven Bank charges ¥110–¥220 per withdrawal (depending on time and amount). Your home bank may add their own foreign transaction fee on top.

    Withdrawal limit: ¥50,000 per transaction, ¥300,000 per day.

    2. Japan Post ATMs — Nationwide Coverage Including Rural Areas

    Japan Post Bank ATMs (at post offices) reliably accept international cards and are particularly valuable if you’re traveling outside major cities. They support Visa, Mastercard, Maestro, Cirrus, and UnionPay. Look for the green ATM with the “ゆうちょ” (Yucho) logo.

    Hours: Post office ATMs have limited hours — typically 9:00–17:30 weekdays, 9:00–12:30 Saturdays, closed Sundays and holidays. Some post offices in major stations have extended hours.

    Fees: ¥110–¥220 depending on time of day and amount. Free during weekday business hours for some card types.

    Withdrawal limit: ¥200,000 per day.

    3. AEON Bank ATMs

    AEON Bank ATMs, found inside AEON malls and some MINISTOP convenience stores, accept international Visa, Mastercard, and UnionPay cards. Available in English. 24-hour operation at most locations.

    Bonus: AEON ATMs often have higher withdrawal limits (up to ¥100,000 per transaction) compared to Seven Bank.

    4. Citibank / SMBC Trust ATMs

    Found mainly in major cities (Tokyo, Osaka, Nagoya). Accept international cards with no domestic fee in some cases. Less common but worth knowing about if you’re in a big city.

    5. International Airport ATMs

    ATMs at Narita, Haneda, Kansai, and Chubu Centrair airports accept foreign cards and are open extended hours. A good first stop when you arrive. Rates are similar to Seven Bank.

    ATMs That DON’T Accept Foreign Cards (Avoid These)

    Knowing which ATMs to skip saves a lot of frustration:

    • Most regional bank ATMs (Mitsubishi UFJ, Mizuho, Sumitomo Mitsui domestic ATMs) — these are primarily for domestic cardholders
    • Convenience store ATMs at Lawson and FamilyMartused to accept foreign cards but the service was discontinued. Do not rely on them.
    • Department store ATMs — usually domestic-only
    • Hospital, government building ATMs — domestic-only
    • Small standalone ATM kiosks in convenience stores, pharmacies, etc. — usually domestic-only

    The rule of thumb: if it doesn’t explicitly say Seven Bank, Japan Post, or AEON, assume it won’t work with your foreign card.

    Step-by-Step: How to Use a Seven Bank ATM

    The Seven Bank ATM interface is designed to be foreigner-friendly. Here’s the exact flow:

    1. Insert your card. The machine will detect it’s a foreign card and ask you to select a language (English, Chinese, Korean, and others available)
    2. Select your language
    3. Choose transaction type: “Withdrawal” (引き出し)
    4. Enter your PIN using the keypad
    5. Select account type: choose “Savings/Checking” — for most foreign debit/credit cards, this doesn’t matter; just pick one and it works
    6. Enter the amount in yen (¥10,000 increments, minimum ¥1,000)
    7. Confirm the fee (shown on screen)
    8. Collect your cash and card

    Important: If your card requires a “credit account” (for credit cards), select that instead of savings at step 6.

    Why Your Foreign Card Still Might Not Work (And the Fix)

    Problem 1: Wrong PIN Format

    Japanese ATMs require a 4-digit PIN. If your home bank’s PIN is longer than 4 digits, it will be rejected. Contact your bank before traveling to set a 4-digit PIN specifically for international ATM use.

    Fix: Call your bank’s international line and request a 4-digit ATM PIN for overseas use.

    Problem 2: Card Not Enabled for International Use

    Some banks (especially US and European banks) require you to explicitly enable “international ATM withdrawals” in your account settings or via a phone call before your trip.

    Fix: Log into your bank’s mobile app and check International/Travel settings. Enable overseas withdrawals. Call your bank if you can’t find the setting.

    Problem 3: Daily Withdrawal Limit Hit

    Your home bank may have a daily international withdrawal limit of $200–$500 equivalent, which can feel small if you’re trying to withdraw ¥50,000 at once.

    Fix: Call your bank to temporarily raise your international withdrawal limit before your trip. Or do multiple smaller withdrawals across different days.

    Problem 4: Card Blocked for Fraud Protection

    Surprise international transactions often trigger automatic fraud blocks. Your bank may block the first withdrawal without warning.

    Fix: Set a travel notice on your bank’s app before arriving in Japan. If blocked, call your bank’s 24-hour international line (have the number saved before you travel).

    Problem 5: ATM Network Incompatibility

    Even at Seven Bank, cards issued on unusual networks (some regional European banks, certain prepaid cards) occasionally don’t connect.

    Fix: Carry a Wise card or Revolut card as a backup. These are specifically designed for international travel and work at all international ATMs in Japan.

    Problem 6: Chip Error / Magnetic Stripe Issues

    Very old cards with only magnetic stripes (no chip) may not work. Most Japanese ATMs require EMV chip cards.

    Fix: Request a new chip card from your bank. Most banks have issued chip cards by 2026 — if yours doesn’t have a chip, it’s time to upgrade.

    Emergency: You’re Stuck Without Cash

    It happens — your card isn’t working, the bank is closed, and you need cash now. Here are your options:

    Option 1: Try a Different ATM Network

    Walk to the nearest 7-Eleven (Seven Bank). If that fails, try Japan Post. If that fails, try AEON. Each uses a slightly different connection to international networks.

    Option 2: Western Union Money Transfer

    Have someone send you money via Western Union. Pick up points exist at some convenience stores and financial institutions. Fees are high but it works in emergencies.

    Option 3: Your Hotel

    Most tourist-class hotels can advance a small amount of yen on your credit card or help arrange emergency cash. Front desk staff deal with this regularly.

    Option 4: Your Country’s Embassy

    In genuine emergencies, your country’s embassy may be able to assist with emergency funds (as a loan to be repaid). This is a last resort but worth knowing about.

    Option 5: PayPay or IC Card Top-Up

    If you have PayPay set up with a foreign credit card, you can pay directly at over 6 million stores without cash. Similarly, top up your digital Suica/Pasmo with a foreign card via Apple Pay or Google Pay — this works even when ATMs don’t.

    Best Cards to Use at Japanese ATMs

    Wise (Formerly TransferWise) Debit Card

    The Wise card consistently works at Japanese ATMs and converts at the real mid-market exchange rate with minimal fees. Available in most countries. Two free ATM withdrawals per month (up to $100 equivalent).

    Revolut

    Another multi-currency card that works well in Japan. Free ATM withdrawals up to certain limits (varies by plan). Uses interbank rates with small markup.

    Charles Schwab (US Only)

    For US travelers, the Charles Schwab Debit Card refunds all ATM fees worldwide, including Seven Bank’s fees. An excellent travel card.

    Starling Bank (UK)

    For UK travelers, Starling Bank offers fee-free withdrawals overseas using real exchange rates. Works well at Seven Bank ATMs.

    How Much Cash to Actually Carry in Japan (2026 Reality Check)

    Japan is increasingly cashless in 2026, but not entirely. Here’s the practical breakdown:

    • Major cities (Tokyo, Osaka, Kyoto): Most tourist restaurants, shops, convenience stores, and transport accept IC cards and major credit cards. You can survive on ¥5,000–¥10,000 cash as an emergency buffer.
    • Smaller cities and rural areas: Cash is still king. Local restaurants, small shops, temples, and shrines often cash-only. Budget ¥20,000–¥30,000 if venturing outside the big cities.
    • Transport: Digital Suica/Pasmo on your phone eliminates the need for cash on trains and buses. Load it with a foreign credit card via Apple Pay or Google Pay.
    • Ryokan and traditional accommodations: Many still prefer or require cash payment at checkout.

    The ideal 2026 Japan money strategy: Digital Suica on your phone + Wise/Revolut card + ¥10,000–¥20,000 cash for small vendors.

    Quick Reference: Japan ATM Cheat Sheet

    ATM Accepts Foreign Cards? Fee Daily Limit English?
    Seven Bank (7-Eleven) ✅ Yes ¥110–¥220 ¥300,000 ✅ Yes
    Japan Post Bank ✅ Yes ¥110–¥220 ¥200,000 ✅ Yes
    AEON Bank ✅ Yes ¥110–¥220 ¥100,000/tx ✅ Yes
    Lawson ATM ❌ No longer
    FamilyMart ATM ❌ No longer
    Regional bank ATMs ❌ Usually no ❌ Usually no

    Frequently Asked Questions

    Can I use Apple Pay or Google Pay to get cash from Japanese ATMs?

    No — Japanese ATMs don’t support contactless card extraction of physical cash. However, you can use Apple Pay / Google Pay to add money to a digital Suica or Pasmo card, which replaces the need for cash on trains, buses, and in many shops.

    Does my credit card work at Japanese ATMs?

    Yes, if it’s a Visa or Mastercard credit card and you’re using a Seven Bank or Japan Post ATM. Note that cash advances from credit cards typically come with high fees and interest from your card issuer — it’s better to use a debit card if possible.

    What’s the best strategy if my bank cards don’t work?

    Get a Wise or Revolut card before your trip. They work at all Japanese international ATMs and use competitive exchange rates. Setup takes about 10 minutes from your phone and the card can be delivered in a few days.

    Are there ATMs open 24 hours in Japan?

    Seven Bank ATMs in 7-Eleven stores are open 24/7 since 7-Eleven never closes. Japan Post ATMs have limited hours. Always use Seven Bank for after-hours cash needs.

    Why does the ATM say “this service is currently unavailable”?

    This usually happens during ATM maintenance windows (typically late night on weekends, especially Saturday nights 23:00–Sunday 07:00 for some Japan Post ATMs). Try a different ATM, or wait until morning. Seven Bank ATMs rarely go down for maintenance.

    Summary: The Japan ATM Problem, Solved

    Japan’s ATM situation is confusing but manageable once you know the rules. The key points to remember:

    • Seven Bank ATMs in 7-Eleven are your most reliable option — find your nearest 7-Eleven before you need it
    • Japan Post ATMs work but have limited hours — not ideal for emergencies
    • Lawson and FamilyMart ATMs no longer accept foreign cards as of 2024
    • Common failures: wrong PIN length, no international enable, daily limit hit, fraud block — all fixable before you travel
    • Carry a Wise or Revolut card as your backup
    • Digital Suica + card payment reduces how much cash you actually need

    With these tools in hand, you’ll never be stranded without cash in Japan again.

    🇯🇵 Travel & Life Essentials for Japan

    Hand-picked gear to make your time in Japan easier. Available on Amazon US & Amazon Japan.

    🔋 Portable charger

    A must for long days of sightseeing and photos.

    View on Amazon (US)View on Amazon Japan

    🔌 Travel plug adapter

    Japan uses Type A outlets. Bring the right adapter.

    View on Amazon (US)View on Amazon Japan

    🎧 Translation earbuds

    Real-time translation to talk without barriers.

    View on Amazon (US)View on Amazon Japan

    As an Amazon Associate, Japan Life Lab earns from qualifying purchases.

  • Japan Driving License Conversion 2026: Complete Guide for Foreigners

    Japan Driving License Conversion 2026: Complete Guide for Foreigners

    📝 AI-Assisted Content Notice
    This article was created with AI writing assistance (ChatGPT, Claude, etc.). Product selection, specifications, and reviews are verified by the Japan Life Lab editorial team.

    Planning to drive in Japan? Whether you’re a tourist, a new expat, or someone settling in for the long term, understanding Japan’s driving license rules is essential — and a lot more nuanced than most people expect.

    Japan does not automatically accept foreign licenses. Depending on your home country, you could sail through the process in an afternoon, or face written tests, practical exams, and multiple visits to a driving license center. This guide walks you through every option — clearly and step by step.

    ⚡ Quick Summary

    • Short visits (under 1 year): Use your home license + IDP — no conversion needed
    • Annex 1 countries (Germany, UK, France, Australia, etc.): Simple document conversion, no test
    • Annex 2 countries (USA, China, Brazil, etc.): Written test + practical driving test required
    • All other countries: Full Japanese license exam from scratch

    Option 1: International Driving Permit (IDP) — For Short-Term Visitors

    If you’re visiting Japan for tourism, a short business trip, or your first year as a resident, an International Driving Permit (IDP) combined with your home country license is the easiest solution.

    An IDP is a multilingual translation of your license recognized under the 1949 Geneva Convention on Road Traffic. Japan is a signatory, which means an IDP issued in your home country is valid for driving in Japan.

    IDP Validity in Japan

    Situation IDP Valid? Duration
    Tourist visit ✅ Yes Up to 1 year from entry
    New resident (first arrival) ✅ Yes 1 year from most recent entry
    Resident returning from abroad ✅ Yes (restarted) 1 year from re-entry date
    Resident for over 1 year (continuous stay) ❌ No longer valid Must convert license

    Important: You must carry both your IDP and your original home country license at all times when driving. An IDP alone is not valid.

    How to Get an IDP Before Leaving Home

    Get your IDP before you travel — you cannot obtain one after arriving in Japan. Contact your national automobile association (AA, AAA, ADAC, RAC, etc.) in your home country. Processing typically takes 1–2 weeks and costs $15–$30 USD (varies by country). The IDP is valid for 1 year from issue date.

    Understanding Japan’s License Conversion System

    Japan categorizes foreign driving licenses into three groups based on bilateral agreements and traffic law similarity. The group determines how easy (or difficult) conversion is.

    Annex 1 Countries — Document Conversion Only (No Test)

    If your license was issued in one of these countries, you can convert it to a Japanese license through a simple document check and eye test — no written or practical exam required.

    ✅ Annex 1 Countries (Easy Conversion)

    🇩🇪 Germany🇫🇷 France🇨🇭 Switzerland 🇧🇪 Belgium🇲🇨 Monaco🇬🇧 United Kingdom 🇦🇺 Australia🇳🇿 New Zealand🇨🇦 Canada 🇰🇷 South Korea🇹🇼 Taiwan🇳🇴 Norway 🇮🇸 Iceland🇸🇪 Sweden🇫🇮 Finland 🇩🇰 Denmark🇦🇹 Austria🇵🇹 Portugal 🇳🇱 Netherlands🇮🇪 Ireland🇮🇹 Italy 🇳🇿 New Zealand🇬🇷 Greece🇱🇺 Luxembourg 🇨🇿 Czech Republic🇳🇿 New Zealand🇸🇬 Singapore

    Note: This list changes periodically. Check with your local driving license center (運転免許センター) for the latest official list.

    Annex 2 Countries — Written + Practical Test Required

    Licenses from Annex 2 countries require you to pass a written knowledge test and a practical driving test at a designated license center. You do NOT need to attend driving school — you test directly at the center. These tests are easier than a full Japanese license exam but still require preparation.

    ⚠️ Annex 2 Countries (Test Required)

    🇺🇸 USA🇨🇳 China🇧🇷 Brazil 🇮🇳 India🇵🇭 Philippines🇹🇭 Thailand 🇮🇩 Indonesia🇻🇳 Vietnam🇲🇾 Malaysia 🇺🇦 Ukraine🇵🇰 Pakistan🇧🇩 Bangladesh

    Most applicants from these countries need 1–3 attempts at the practical driving test.

    Step-by-Step: How to Convert Your Foreign License (Annex 1 Countries)

    If you’re from an Annex 1 country, here’s the complete conversion process. Budget a full day and bring everything listed below — missing even one document means making another trip.

    Step 1: Get a JAF Translation of Your License

    The Japan Automobile Federation (JAF) is the only organization authorized by the Japanese government to translate foreign driving licenses for the purpose of license conversion. An unofficial translation will not be accepted.

    📋 How to get a JAF Translation

    1. Visit your nearest JAF branch (no appointment needed in most locations)
    2. Bring your foreign driving license, your passport, and your residence card (在留カード)
    3. Fill out a simple application form
    4. Pay ¥3,000 (same-day processing, typically takes 30–60 minutes)
    5. You receive a certified Japanese translation

    JAF branches: Find your nearest JAF office →

    Step 2: Gather All Required Documents

    Document Notes
    Foreign driving license (original) Must be current and valid
    JAF translation of your license Obtained from JAF — see Step 1
    Passport Current passport + any old passports showing entry stamps if relevant
    Residence card (在留カード) Must show current address
    Passport-size photos (×2) 3cm × 2.4cm, recent, plain background
    License acquisition history certificate Required for some countries (issued by your home country’s DMV/DVLA)
    Fee payment Cash only at most license centers — bring enough yen

    Important note on the license acquisition certificate: Some prefectures require you to prove when and where you obtained your original license. This is to confirm you actually lived in your home country for at least 3 months after getting the license (required to prevent license tourism). Check with your local license center in advance.

    Step 3: Go to Your Prefectural Driving License Center

    You must apply at the driving license center (運転免許センター or 運転免許試験場) in the prefecture where you are registered as a resident. You cannot apply at a police station for license conversions.

    🏢 Major License Centers

    • Tokyo: Fuchu (府中試験場), Samezu (鮫洲試験場), Koto (江東試験場)
    • Osaka: Morishoji (門真運転免許試験場)
    • Kanagawa: Futamatagawa (二俣川試験場)
    • Aichi: Inazawa (稲沢試験場)
    • Kyoto: Kyoto Driving License Center (京都府運転免許試験場)

    Most centers operate Monday–Friday, 8:30 AM – 4:00 PM. Arrive early — the process takes most of the morning.

    Step 4: Submit Documents and Eye Test

    At the license center, you’ll submit your documents at the designated counter for foreign license conversions. Staff will review everything and may ask questions through an interpreter card or simple English.

    You’ll then take a basic eye test (visual acuity check). No medical examination is required for most conversions. The process typically takes 2–4 hours total from arrival to receiving your new license.

    Step 5: Pay the Fee and Receive Your Japanese License

    Fee Item Approximate Cost
    JAF translation (Step 1) ¥3,000
    License application fee ¥2,050
    Traffic safety association fee (optional) ¥1,500–¥2,000 (you can decline)
    Total (Annex 1, easy conversion) Approximately ¥5,000–¥7,000

    You’ll receive your Japanese license on the same day. It will show the same license class as your foreign license (standard car, automatic, etc.). Note that your home country license will be returned to you — Japan does not confiscate it.

    Annex 2 Countries: Written Test + Practical Driving Test

    If your license is from an Annex 2 country (USA, China, Brazil, etc.), the conversion process has two additional steps: a written knowledge test and a practical driving test on a designated course at the license center.

    The Written Test

    The written test consists of 10 true/false questions about Japanese traffic laws. You need 7 or more correct to pass. The test is available in English, Chinese, Korean, Portuguese, Spanish, and several other languages at most major license centers. Pass rate is high — preparation with the official study materials takes about 1–2 hours.

    📚 Study Resources (Free)

    • JAF’s multilingual driving test practice page (jaf.or.jp)
    • Tokyo Metropolitan Police Dept. free practice tests (available in English)
    • Search “Japan driving license written test practice” for unofficial English prep sites

    The Practical Driving Test

    This is the step where many applicants from Annex 2 countries struggle. The practical test is conducted on a closed driving course inside the license center — not on public roads. Examiners evaluate precise compliance with Japanese traffic rules, not just general driving ability.

    Common reasons for failure:

    • Not checking mirrors and blind spots exaggeratedly (you must visibly turn your head)
    • Stopping position at intersections (must stop before the white line, then creep forward)
    • Lane positioning on curves (stay left in Japan — left-hand traffic)
    • Speed (often too fast on the course; 20–30 km/h is typical)
    • Not confirming safety before opening the car door (check via mirror + physical turn)

    Many people from Annex 2 countries need 2–4 attempts. Each attempt costs around ¥2,550–¥3,450 in fees. You can retake on a different day — most centers allow walk-in appointments for license conversion retests.

    Tips to Pass the Practical Test First Try

    ✅ Practical Test Success Tips

    1. Exaggerate every safety check — mirrors, blind spots, door check. Make it obviously visible to the examiner.
    2. Go slow — Test-takers who fail often drive at normal road speeds. Keep it slow and deliberate.
    3. Practice the specific course — Arrive early and watch others attempt the course before your turn. Some centers post course maps online.
    4. Left-side driving habit — If you’re from a right-hand traffic country, spend time mentally adjusting before the test.
    5. Watch YouTube walkthroughs — Many expats post their own license center test run-throughs. Search your specific center name + “driving test.”
    6. Ask the examiner for feedback — After each attempt, you can request a reason for failure. Use this to improve next time.

    Important Rules After Getting Your Japanese License

    Rule Details
    License validity Japanese licenses expire on your 3rd birthday after issuance (or 5th if gold license)
    Renewal Renew at the same license center. Includes a short safety seminar.
    Probationary period New licensees (including converted licenses) start at “green” license status
    Alcohol limit 0.03% BAC — Japan’s limit is stricter than most countries. Zero tolerance enforced.
    Always carry your license Required at all times while driving. Police checks do happen.

    Frequently Asked Questions

    Can I drive in Japan with just my home country license?

    No. A home country license alone is not valid in Japan. You need either a valid IDP (International Driving Permit) issued in your home country alongside your license, or a converted Japanese license. Police do check and penalties include fines and potential license suspension.

    I’m from the USA — how many attempts does the practical test take?

    Varies widely. Some people pass on the first try; others take 4–5 attempts. The most common failure point is the exaggerated safety checks. Watch YouTube videos specific to your license center and prepare accordingly. Budget time and about ¥10,000–¥15,000 for multiple attempts.

    What if my license has expired?

    An expired foreign license generally cannot be converted. Try to renew it in your home country before applying. Some prefectures may accept a license expired within a certain period — ask your local license center directly.

    Can I use an online translation service instead of JAF?

    No. Only JAF translations are accepted by Japanese authorities for license conversion purposes. Other translation services, notarized translations, or embassy translations are not accepted.

    Do I need to give up my home country license?

    No. Japan returns your original foreign license to you after the conversion. You keep both licenses. However, you should contact your home country’s licensing authority to check if having a Japanese license affects your home license status.

    Can I use my Japanese license to drive in other countries?

    Yes — in countries that are signatories to the Geneva Convention. You’ll need a Japanese IDP (available through JAF, ¥3,000) to drive in those countries.

    📥 Japan Expat Starter Kit 2026

    Banking, health insurance, housing, mobile plans, Suica, taxes & daily survival — all in one downloadable PDF guide.

    📥 Get the Guide — $19

    30-day money-back guarantee · Instant download

  • Japan Moving Hacks 2026: 15 Things Nobody Tells You Before You Move

    Japan Moving Hacks 2026: 15 Things Nobody Tells You Before You Move

    Why Moving to Japan Is Harder Than You Think (But These Hacks Help)

    Moving to Japan is exciting — but between the paperwork, language barriers, and unwritten rules, most expats hit the same walls. After helping thousands of foreigners navigate Japanese bureaucracy, we’ve compiled the 15 most game-changing hacks that official guides never mention. Use these to save time, money, and sanity.

    Before You Arrive: Preparation Hacks

    Hack #1: Get Your International Driving Permit BEFORE You Leave Home

    Japan’s driving license conversion requires a Japanese translation of your foreign license — which takes 1–3 weeks and ¥3,000+ from JAF. But if you get an International Driving Permit (IDP) from your home country before moving, you can drive legally for up to 1 year from your entry date. This buys you time to sort out the conversion without being stranded.

    • Get your IDP at your country’s automobile association (AAA, AA, ADAC, etc.) for $20–$30
    • Valid in Japan for 1 year from arrival (check your entry stamp date)
    • After 1 year, you MUST convert or stop driving — no exceptions
    • Countries excluded from IDP: China, South Korea, Germany (different treaty) — check JAF’s list

    Hack #2: Open a Wise Account in Your Home Country

    Japanese banks are notoriously hard to open for newcomers (most require 6 months of residence). Wise gives you a Japanese bank account number before you even land, lets you receive JPY, and offers real exchange rates. Use it to pay rent deposits and utilities until your Japanese bank account is sorted.

    • Open online before departure — verification takes 1–3 days
    • Get a Japanese virtual account number to receive yen transfers
    • Exchange rate is mid-market (banks charge 3–5% more)
    • Pairs perfectly with Rakuten Bank (easiest Japanese bank for foreigners)

    Hack #3: Bring Physical Copies of EVERYTHING

    Japanese bureaucracy loves paper. Bring certified copies of your birth certificate, passport, university degree, marriage certificate (if applicable), and employment contract. Getting these documents re-certified internationally while in Japan is a nightmare of embassies and apostilles.

    • Bring 5+ passport photos (Japanese sizes: 3×4cm, 3.5×4.5cm, 4×3cm — different for different forms)
    • Certified translations add ¥3,000–¥10,000 per document in Japan
    • Some documents need apostille certification (check with the target Japanese authority)
    • Store everything in a waterproof A4 folder with labeled sections

    First Week in Japan: Survival Hacks

    Hack #4: Register at Your Ward Office Within 14 Days

    The Juminhyo (住民票) is Japan’s master document for everything: bank accounts, health insurance, SIM cards, and more. You legally must register within 14 days of moving in.

    • Bring: Passport, Residence Card, and your address
    • Ward office hours: typically 8:30am–5:15pm weekdays
    • Request 3–5 copies of your Juminhyo (¥300 each) — you’ll need them repeatedly
    • Share house operators can confirm your address for registration

    Hack #5: Apply for My Number Card Immediately

    The My Number Card is now your health insurance card and unlocks online government services. It takes 6–8 weeks to arrive — apply the same week you register at the ward office.

    • Apply online using the QR code on your notification letter
    • New in 2026: Most hospitals now require My Number Card as health insurance card
    • Link to your bank account to receive government payments faster
    • Store the 4-digit PIN safely — needed for all digital uses

    Hack #6: Buy a Suica Card at the Airport

    Suica works on trains, buses, convenience stores, vending machines, and even some taxis. Get one immediately at the airport — don’t fight ticket machines in Japanese with luggage.

    • Available at JR East ticket machines at Narita and Haneda airports
    • Load ¥5,000–¥10,000 to start
    • iPhone/Android with Suica app can add it digitally (no physical card needed)
    • ¥500 deposit is refundable when you return the card

    Housing and Money Hacks

    Hack #7: Start in a Guesthouse, Then Switch to Regular Apartment

    Monthly apartments for foreigners charge a 30–50% premium. Once you have your Juminhyo and a rental guarantee company, switch to a standard contract for massive savings.

    • Regular apartments: ¥60,000–¥90,000/month (1K–1LDK Tokyo suburbs)
    • Foreigner-targeted furnished: ¥90,000–¥150,000/month equivalent space
    • Use Suumo.jp, HOMES, or At Home for standard listings
    • Rental guarantee companies replace the need for a Japanese guarantor

    Hack #8: Negotiate Shikikin and Reikin

    Shikikin (deposit) and Reikin (key money — non-refundable gift to landlord) are both negotiable, especially in areas with vacant units.

    • Standard: 2 months shikikin + 2 months reikin = 4–5 months upfront
    • Negotiated: Often get 1+0 or 1+1, saving ¥100,000–¥200,000
    • Reikin is more negotiable in Osaka than Tokyo culturally
    • Zero-zero apartments exist but often have higher monthly rent

    Hack #9: Open Rakuten Bank + Rakuten Card Together

    Rakuten Bank is the easiest Japanese bank to open as a foreigner (online, accepts new residents) and Rakuten Card is one of the only cards that doesn’t require years of credit history in Japan.

    • Rakuten Bank: 100% online application, English UI, decision in 1–3 days
    • Rakuten Card approval rate for new foreigners is higher than other cards
    • 1% points on all purchases, 3–5× during Rakuten Sales events
    • Set up automatic payments to earn passive Rakuten Points every month

    Daily Life Hacks

    Hack #10: Start with IIJmio or Rakuten Mobile SIM

    Major carriers require proof of address and a Japanese credit card. Start with IIJmio or Rakuten Mobile (both accept new residents) and switch to a cheaper plan after you’re settled.

    • Rakuten Mobile: ¥0 for up to 1GB/month — genuinely free tier
    • IIJmio: ¥858/month for 2GB — cheapest reliable option
    • Both accept new residents with just a Residence Card and Juminhyo
    • After 6 months, consider ahamo (docomo) for better nationwide coverage

    Hack #11: Use Convenience Stores as Your Admin Office

    Japanese convenience stores have multifunction printers for official documents, tax payments, and utility bills — saving hours of ward office queuing.

    • Print Juminhyo copies from My Number Card at any combini: ¥100–¥200
    • Pay NHK, tax bills, and utilities at the register
    • 7-Eleven netprint: upload PDF online, print at any 7-Eleven within 24 hours
    • Scan and print any document: ¥30–¥60 per page

    Hack #12: Download These Apps Before You Need Them

    Japan’s app ecosystem is fragmented. Have these installed before a stressful moment arrives.

    • Google Translate with camera — point at menus, signs, documents
    • Yahoo! Transit — Japan’s most accurate train/bus app
    • PayPay — dominant cashless payment, works at 90%+ of shops
    • Mercari — Japan’s best secondhand marketplace for furnishing cheaply
    • Line — Japan’s primary messaging app for landlords, employers, friends

    Hack #13: Furnish with Mercari and Sodai Gomi Days

    Use Mercari (Japan’s biggest secondhand app) to buy essentially-new items at 30–70% off. Watch for sodai gomi (粗大ごみ) collection days — furniture left on the kerb is free.

    • Mercari: Set location filter 5–10km, search in Japanese (洗濯機, 冷蔵庫, etc.)
    • Sodai gomi days: Check your ward’s website for monthly collection schedule
    • Nitori and IKEA for budget new furniture when needed
    • Hard Off and 2nd Street: physical recycle shops for electronics and appliances

    Long-Term Hacks

    Hack #14: Build a Document System from Day One

    Japanese bureaucracy generates enormous paperwork. Set up a physical folder and digital backup immediately — future-you will need that 3-year-old tax certificate for visa renewal.

    • Physical folder sections: Visa/Residence, Tax, Insurance, Housing, Bank, Employment
    • Digital: scan everything with your phone camera the day you receive it
    • Keep at least 7 years of tax records (Japanese law requirement)
    • Photograph all large purchase receipts (warranty claims can be strict)

    Hack #15: Start Learning Japanese Even If You Think You Don’t Need It

    English works in tourist areas but fails at ward offices, hospitals, and lease negotiations. Even N5–N4 level Japanese opens up 10× more apartments, better jobs, and real friendships.

    • Anki flashcards: 15 minutes/day builds compound retention over years
    • HelloTalk or Tandem: free conversation practice with native speakers
    • NHK Web Easy: simplified Japanese news for intermediate learners
    • Language exchange meetups (Meetup.com): free and genuinely social

    Your Japan Moving Checklist

    • ✅ IDP from home country before leaving
    • ✅ Wise account opened before arrival
    • ✅ Physical document copies packed
    • ✅ Ward office registration within 14 days
    • ✅ My Number Card application submitted
    • ✅ Suica card loaded at airport
    • ✅ Temporary housing booked, budget apartment search started
    • ✅ Shikikin/Reikin negotiation attempted
    • ✅ Rakuten Bank and Card applications submitted
    • ✅ IIJmio or Rakuten Mobile SIM activated
    • ✅ Combini services explored
    • ✅ Essential apps installed
    • ✅ Mercari account created
    • ✅ Document folder system set up
    • ✅ Japanese study routine started
  • Going Cashless in Japan 2026: Complete Guide to PayPay, Suica & IC Cards for Foreigners

    Going Cashless in Japan 2026: Complete Guide to PayPay, Suica & IC Cards for Foreigners

    🇯🇵 Travel & Life Essentials for Japan

    Hand-picked gear to make your time in Japan easier. Available on Amazon US & Amazon Japan.

    🔋 Portable charger

    A must for long days of sightseeing and photos.

    View on Amazon (US)View on Amazon Japan

    🔌 Travel plug adapter

    Japan uses Type A outlets. Bring the right adapter.

    View on Amazon (US)View on Amazon Japan

    🎧 Translation earbuds

    Real-time translation to talk without barriers.

    View on Amazon (US)View on Amazon Japan

    As an Amazon Associate, Japan Life Lab earns from qualifying purchases.

  • Japan’s Hidden Social Rules: 15 Unwritten Laws Every Foreigner Must Know

    Japan’s Hidden Social Rules: 15 Unwritten Laws Every Foreigner Must Know

    Japan is famous for being polite, clean, and incredibly organized — but scratch the surface and you’ll find a complex web of unwritten social rules that no guidebook fully explains. Breaking these invisible codes won’t get you arrested, but it will earn you silent stares and quiet judgment from Japanese people around you.

    We asked expats, cultural consultants, and long-term Japan residents: what are the social rules that took you longest to figure out? Here are the 15 most important ones — and why they matter.

    📖 This guide is part of the Japan Expat Starter Kit
    Living in Japan long-term? Our Japan Expat Starter Kit PDF covers all the essentials — from banking to garbage rules to navigating bureaucracy in English.

    1. Never Eat or Drink While Walking

    This one surprises almost every visitor. In Japan, eating while walking is considered rude and messy. You’ll notice Japanese people stop completely at a food stall, eat, then continue walking. The exception: festival food at matsuri events, where eating while walking is acceptable because everyone is doing it. Drinks from vending machines? Find a spot to stand still.

    2. Queue Culture Is Sacred

    The Japanese queue for everything — trains, escalators, ramen shops, ATMs — and they do it with near-military precision. Never cut in line, even if the queue looks informal. On escalators, stand on the left (except in Osaka, where locals stand on the right). On train platforms, the boarding lines painted on the floor are followed religiously.

    3. Talking Loudly on the Phone Is Taboo on Public Transit

    Train cars in Japan are remarkably quiet. Phone calls are actively discouraged — you’ll see signs everywhere. If your phone rings, step into the space between carriages or wait until you exit. Texting and messaging are fine. Even among groups, conversations are kept low-volume. This is one rule that shocks visitors from louder cultures the most.

    4. Cash Is Still King (But This Is Changing Fast)

    Despite being a tech-forward country, Japan remained cash-heavy longer than most developed nations. Many small restaurants, temples, and local shops are cash-only. Always carry ¥5,000–¥10,000 in cash, especially outside major cities. PayPay and IC cards (Suica/Pasmo) are now widely accepted, but don’t assume cards work everywhere.

    5. Remove Your Shoes — Always

    Before entering any Japanese home, many traditional restaurants (zashiki seating), some traditional inns (ryokan), and even some offices, you remove your shoes. The key signal: a step up (tataki/genkan) and slippers at the entrance. If you see this, remove your shoes. Place them neatly pointing toward the exit. Never step on the tataki with outdoor shoes.

    6. Gift-Giving Has Complex Rules

    Giving gifts is common and important in Japan, but the rules are nuanced. Never give gifts in sets of 4 (the number 4 sounds like “death” in Japanese). Gifts are typically not opened immediately in front of the giver to avoid showing disappointment. When giving or receiving, use both hands. The wrapping matters as much as the gift itself — messy wrapping is disrespectful.

    7. The “Quiet Car” Culture Extends Everywhere

    Japanese public spaces operate at a much lower volume than Western equivalents. Museums, elevators, convenience stores — even in busy areas, people maintain a hushed baseline. This isn’t unfriendliness; it’s cultural courtesy. Laughing loudly, speaking at a high volume in restaurants, or playing music without earphones will attract uncomfortable stares.

    8. Business Cards Are Sacred Objects

    If you’re in a business context in Japan, the meishi (business card) exchange is a ritual, not a formality. Present your card with both hands, Japanese side up if bilingual. Receive cards with both hands and read it carefully. Never write on it, stuff it in your pocket, or put it on a table carelessly. Business card holders are standard equipment for professionals.

    9. “Yes” Doesn’t Always Mean Yes

    Direct refusal is considered impolite in Japanese culture. “Muzukashii desu ne” (that’s difficult…) often means no. A sharp intake of breath through the teeth (“saa…”) means the answer is no. If someone says “I’ll think about it” or doesn’t follow up, the answer is usually no. Learning to read these indirect signals saves enormous misunderstanding.

    10. Don’t Tip — Ever

    Tipping in Japan is not just unnecessary — it can actually be considered rude, as if implying the service provider is underpaid or needs charity. Service quality in Japan is consistently high because it’s considered a professional standard, not something earned through tips. This applies to restaurants, taxis, hotels, and hairdressers.

    11. Garbage Rules Are Extremely Strict

    Japan has one of the most complex garbage separation systems in the world. Rules vary by municipality, but typically: burnable garbage, non-burnable, plastic, cardboard, and glass are all separate streams with specific collection days. Putting garbage out on the wrong day or in the wrong bag is a neighborhood offense — your bag may be tagged and returned to you. Read our Japan Garbage Guide for Foreigners for full details.

    12. Pointing Is Rude

    In Japanese culture, pointing at people or things directly with a single finger is considered rude. Instead, Japanese people use an open hand with all fingers extended to indicate direction or objects. This is a subtle one that most foreigners don’t notice until someone points it out.

    13. The Onsen Rules Are Non-Negotiable

    Hot spring baths (onsen) require complete nudity — swimwear is not allowed in traditional baths. Wash and rinse thoroughly before entering the communal bath. Keep your towel out of the water (fold it on your head). Don’t let the towel touch the water. Tattoos are still banned in most onsen, though this is slowly changing in tourist areas.

    14. Expressing Gratitude Constantly

    Japanese social interaction involves constant expressions of gratitude that can seem excessive to outsiders. “Itadakimasu” before eating, “Gochisousama” after, “Osewani narimashita” (thank you for your support) to anyone who helped you — these aren’t just pleasantries, they’re expected social glue. Skipping them marks you as ungrateful.

    15. Personal Space in Crowds vs. Quiet Trains

    Japan seems to contradict itself: trains can be packed beyond Western imagination, yet personal space is fiercely respected in other contexts. The key is context. In rush-hour trains, physical proximity is unavoidable and accepted. But in parks, restaurants, and public areas, deliberately sitting directly next to a stranger when other seats are available is strange and uncomfortable for both parties.

    The Bottom Line

    Understanding Japan’s unwritten rules transforms your experience from tourist to insider. You don’t need to follow every rule perfectly — Japanese people are generally forgiving of foreigners — but showing awareness and effort goes a long way. The goal isn’t perfection: it’s respect.

    📖 Recommended reading: Our Japan Convenience Store Guide and Suica Complete Guide cover more Japan essentials for expats and visitors.

  • Japan Garbage Separation Guide 2026: How to Sort Trash Without Getting in Trouble (Complete Expat Guide)

    Japan Garbage Separation Guide 2026: How to Sort Trash Without Getting in Trouble (Complete Expat Guide)

    Moving to Japan is exciting — but Japan’s garbage system can feel like learning a second language. Miss the wrong pickup day, use the wrong bag, or forget to rinse a bottle, and your trash gets left behind with a stern red sticker. This comprehensive guide covers everything you need to know to sort your garbage correctly in Japan, from basic categories to city-specific rules and common expat mistakes.

    ⚠️ Quick Note: Japan’s garbage rules vary significantly by city, ward, and even neighborhood. Always check your local city hall website or ask your building manager for the rules specific to your address.

    Why Japan’s Garbage System Is So Strict

    Japan generates around 40 million tons of household waste per year, yet its landfills are remarkably small by international standards. The secret is an incredibly efficient recycling and incineration system built on strict source separation. When residents properly sort their trash, municipalities can:

    • Incinerate combustible waste at high temperatures to generate electricity
    • Recycle plastics, glass, cans, and paper at near-100% capture rates
    • Minimize landfill use (Japan’s landfills have only ~20 years of remaining capacity)
    • Keep cities clean and reduce odors from improper disposal

    For foreigners, the system can feel overwhelming at first. Many expats report that garbage sorting was one of the biggest adjustment challenges when moving to Japan. But once you understand the logic behind it, it becomes second nature within a few weeks.

    The 4 Main Garbage Categories

    While exact rules differ by municipality, almost every city in Japan uses some version of these four core categories:

    Category Japanese Typical Collection Bag Required
    Burnable (Combustible) 可燃ごみ 2–3× per week Usually required
    Non-Burnable (Incombustible) 不燃ごみ 1–2× per month Usually required
    Recyclables 資源ごみ 1–2× per week Varies by item
    Oversized (Bulky) 粗大ごみ By appointment No bag — sticker needed

    🔥 Burnable Garbage (可燃ごみ / Moeru Gomi)

    This is the most frequently collected category — usually 2 to 3 times per week. If in doubt about whether something is burnable, a good rule of thumb is: if it can catch fire and isn’t recyclable, it’s probably burnable.

    What Goes in Burnable Trash

    🍽️ Food & Kitchen
    • All food scraps and leftovers
    • Vegetable peels and cores
    • Meat bones (small ones)
    • Eggshells
    • Coffee grounds, tea bags
    • Used cooking oil (absorbed in paper)
    • Disposable chopsticks and wooden utensils
    • Paper plates and paper cups
    • Dirty pizza boxes (if contaminated)
    • Used napkins and paper towels
    • Wax paper and baking parchment
    📦 Paper & Packaging
    • Paper bags (without plastic handles)
    • Tissues and facial wipes
    • Receipts and thermal paper
    • Stickers and adhesive labels
    • Photographs and film negatives
    • Carbon paper
    • Paper cartons that cannot be recycled (contaminated)
    • Envelope windows (composite material)
    • Shredded paper (often too small to recycle)
    👗 Textiles & Soft Items
    • Old clothes (not recyclable grade)
    • Underwear and socks
    • Worn-out shoes (rubber soles go to non-burnable)
    • Stuffed animals and soft toys
    • Pillows and cushions
    • Curtains (under 50cm)
    • Rope and twine (natural fibers)
    • Rubber gloves and aprons
    🧴 Plastics (Burnable in some cities)
    • Plastic wrap (if not marked as recyclable)
    • Plastic bags without recycling mark
    • Styrofoam food trays (soiled)
    • Composite packaging
    • Used disposable razors
    • Plastic toothbrushes
    • Vinyl items

    ⚠️ Some cities (like Yokohama) separate plastics from burnable. Check local rules.

    💡 Pro tip: Food scraps are the trickiest part of burnable garbage. Drain as much liquid as possible before disposing — wet garbage is heavier to transport and harder to incinerate efficiently. Some apartments have strict rules about food waste collection days to prevent odors and vermin.

    🪨 Non-Burnable Garbage (不燃ごみ / Moenai Gomi)

    Non-burnable garbage is collected less frequently — usually once or twice a month. These are items that can’t be safely incinerated. Many contain materials that release toxic fumes at high temperatures.

    What Goes in Non-Burnable Trash

    🏠 Home Items
    • Ceramics, pottery, and porcelain
    • Glass items (not bottles — see recyclables)
    • Mirrors
    • Light bulbs (wrap in newspaper)
    • Fluorescent tubes (separate in some cities)
    • Candles (wax)
    • Thermometers (non-mercury)
    • Magnets
    • Clocks and watches (without batteries)
    • Hangers (metal and plastic)
    • Umbrellas under 50cm
    🔧 Metal & Hardware
    • Frying pans and pots (metal)
    • Knives and scissors (wrap securely)
    • Nails, screws, and bolts
    • Metal wire and chains
    • Padlocks and keys
    • Metal caps and lids (small)
    • Spray can nozzles
    • Staples and paper clips
    • Razor blades (wrap carefully)
    🎮 Small Electronics
    • Hair dryers and curling irons
    • Electric shavers
    • Small kitchen appliances (hand mixers etc.)
    • Remote controls (remove batteries first)
    • Calculators
    • Landline phones (small)
    • Radio and portable speakers (small)

    ⚠️ Larger appliances follow the Home Appliance Recycling Law. See section below.

    ⚠️ Handle with Care
    • Sharp items — wrap in thick paper, label 危険 (Danger)
    • Broken glass — double bag and label 危険 or ガラス
    • Used light bulbs — wrap in original box or newspaper
    • Spray cans — must be completely empty (depressurize first)

    ♻️ Recyclables (資源ごみ / Shigen Gomi)

    Recyclables are the most complex category because they’re further divided into subcategories — and the rules for preparation (rinsing, removing caps, flattening) are strictly enforced. When in doubt, clean it out.

    Paper Recyclables (紙類)

    Tie these in bundles with string — do not put them in plastic bags (unless your municipality specifically allows it). Keep them dry.

    • Newspapers (新聞紙): Bundle separately from magazines. Remove any plastic wrappers.
    • Cardboard boxes (ダンボール): Break down flat. Remove tape and staples if possible. Keep dry.
    • Magazines and catalogs (雑誌): Bundle separately from newspapers.
    • Office paper and envelopes (雑紙): Anything that’s clean paper — envelopes (remove plastic windows), printouts, wrapping paper without foil coating.
    • Milk cartons and juice cartons (牛乳パック): Rinse thoroughly, open flat, dry completely. Many supermarkets have dedicated collection boxes.

    Cans (缶類)

    • Aluminum cans (アルミ缶): Rinse, crush if local rules allow.
    • Steel/tin cans (スチール缶): Rinse thoroughly. Remove paper labels if possible.
    • Aerosol cans (スプレー缶): Must be completely empty — use outdoors to depressurize. Pierce the can ONLY if your municipality requires it (many no longer recommend this).

    Bottles and Glass (びん類)

    • Glass bottles (ガラスびん): Rinse thoroughly. Remove caps (metal caps go to non-burnable; plastic caps go to plastic recyclables or burnable depending on your city).
    • Beer bottles, sake bottles, soy sauce bottles: Rinse and separate by color in some cities (clear, brown, other).
    • Broken glass: Goes to non-burnable, NOT recyclables.

    PET Bottles (ペットボトル)

    • Remove the cap (separate category or burnable).
    • Remove the label (separate category or burnable).
    • Rinse thoroughly — even a small amount of liquid can contaminate a whole batch.
    • Crush flat and put the lid back on for transport (or as instructed locally).
    • Only bottles marked with the PET bottle symbol (ペットボトル) qualify. Other plastic containers do not.

    Plastic Containers and Packaging (プラスチック製容器包装)

    Look for the plastic recycling mark (プラ) on the package. These must be rinsed clean.

    • Styrofoam trays (clean only)
    • Plastic wrapping from food products
    • Plastic bags and zip-lock bags
    • Shampoo bottles and soap pumps (rinse thoroughly)
    • Plastic cups, lids, and containers
    • Blister packaging (from medicine, electronics)

    Important: If a plastic container is too dirty to clean (e.g., an oil container with residue), it goes to burnable garbage.

    ♻️ Recycling Golden Rules:
    1. Rinse everything — contaminated recyclables go to landfill, defeating the purpose
    2. Remove caps from bottles — different material = different recycling stream
    3. Flatten cardboard — reduces collection truck trips
    4. Keep paper dry — wet paper cannot be recycled
    5. Never put food-contaminated items in recycling — when in doubt, throw it out

    🏙️ City-by-City Garbage Rules

    Japan has over 1,700 municipalities, each with its own rules. Here’s a detailed breakdown for the cities most expats live in.

    🗼 Tokyo (東京)

    Tokyo is divided into 23 special wards (特別区) plus cities and towns in the western suburbs. Each ward manages its own garbage collection independently, which means the rules in Shinjuku differ from those in Shibuya or Minato.

    Basic Categories for Most Tokyo Wards

    • Combustible garbage (可燃ごみ): 2–3 times per week (varies by ward)
    • Non-combustible garbage (不燃ごみ): 1–2 times per month
    • Recyclables — Cans, Bottles, PET Bottles: Once per week, often separated
    • Paper recyclables: Once per week (ward-specific pickup day)
    • Plastic containers (プラスチック製容器包装): Once per week in most wards

    Tokyo Ward-Specific Notes

    Ward Combustible Days Special Notes
    Shinjuku (新宿区) Tue, Fri + 1 other Dedicated small metal day (小金属) once/month
    Shibuya (渋谷区) Mon, Thu Paper recyclables on specific Tuesday
    Minato (港区) Tue, Fri Resource collection twice/week (Tue and Fri)
    Setagaya (世田谷区) Mon, Thu or Tue, Fri Depends on your exact address within the ward
    Sumida (墨田区) Wed, Sat Soft plastics on alternate weeks
    Bunkyo (文京区) Varies by address Mixed cans/bottles/PET same day

    Garbage bags in Tokyo: Most wards do not require official colored bags — any transparent or semi-transparent bag is usually fine. However, a few wards (like Suginami) have moved to official municipal bags. Always confirm with your ward office.

    Tokyo Garbage Stations (ゴミ捨て場)

    In Tokyo, most residential neighborhoods use communal garbage stations (ゴミ置き場) rather than individual curbside pickup. These are shared spots — usually a small fenced area or a designated pavement section — where residents put out their trash on collection morning. Rules for garbage stations:

    • Only put garbage out on the designated collection morning (not the night before in most wards)
    • Cover the pile with a net (provided by the neighborhood association) to deter crows
    • Keep the area clean after collection — pick up any stray items
    • Larger apartment buildings usually have their own garbage room (ゴミ置き場) with separate bins

    🌸 Yokohama (横浜市)

    Yokohama has one of the most complex garbage systems in Japan — 10 separate categories. It famously reduced waste by 30% in the early 2000s by introducing this rigorous system. Many expats moving to Yokohama are initially overwhelmed, but the city provides excellent multilingual materials.

    Yokohama’s 10 Garbage Categories

    1. Burnable garbage (燃やすごみ) — food scraps, paper, textiles, dirty plastic packaging [Twice per week]
    2. Non-burnable garbage (燃えないごみ) — ceramics, glass, small metals [Twice per month]
    3. Plastic containers and packaging (プラスチック製容器包装) — rinsed, with プラ mark [Once per week]
    4. Bottles (びん) — rinsed glass bottles, separated by color [Twice per month]
    5. Cans (缶) — aluminum and steel cans, rinsed [Twice per month]
    6. PET bottles (ペットボトル) — cap and label removed, rinsed, crushed [Once per week]
    7. Newspaper (新聞) — bundled with string [Once per week]
    8. Cardboard (ダンボール) — flattened, bundled with string [Once per week]
    9. Paper packaging (紙製容器包装) — milk cartons, paper bags, paper cups [Once per week]
    10. Mixed paper (雑誌・雑紙) — magazines, envelopes, small boxes [Once per week]
    Yokohama Official Bag: Yokohama requires the use of official “Yokohama G30 Netting” bags for plastic container collection and some other categories. You can purchase these at supermarkets, convenience stores, and 100-yen shops for about ¥200–400 per roll.

    🌺 Osaka (大阪市)

    Osaka City uses a simpler 3+1 system compared to Yokohama:

    • Burnable garbage (普通ごみ) — Twice per week. Must use designated light-blue semi-transparent bags (45L: ¥320, 30L: ¥230, 20L: ¥160). Available at convenience stores and supermarkets.
    • Non-burnable garbage (不燃ごみ) — Once per month. Must use Osaka City official beige bags.
    • Resource garbage (資源ごみ) — Once per week. Glass bottles, PET bottles, cans, paper, and cardboard all go out on the same day. Boxes and paper must be bundled with string, not put in bags.
    • Oversized garbage (粗大ごみ) — By appointment. Call 0120-79-0053 or apply online. Fee: ¥200–2,400 depending on item size.

    Key Osaka rule: The garbage station (ゴミ置き場) opens at 8:00 AM on collection days. Do not put garbage out the night before — it’s against the rules and risks warning from your neighborhood association.

    🌊 Fukuoka (福岡市)

    Fukuoka uses a color-coded bag system. Every category requires a specific color:

    • Burnable garbage (燃えるごみ) — Black bags [Mon, Thu, or Tue, Fri depending on district]
    • Non-burnable garbage (燃えないごみ) — Blue bags [First and third Wednesday of each month]
    • PET bottles — Clear bags [Every Wednesday]
    • Cans and glass bottles — Clear bags [Every Wednesday with PET bottles]
    • Cardboard and paper — Bundle with string, no bag needed [Every Wednesday]

    Fukuoka’s colored bag system makes it easy to see at a glance if something is in the wrong bag. Bags are sold at supermarkets and drug stores in packs — the city does not provide them free of charge.

    🌸 Kyoto (京都市)

    Kyoto has a 4-category system that’s relatively straightforward for foreigners:

    • Burnable waste (可燃ごみ) — 2× per week
    • Non-burnable / small metal (不燃・小型金属ごみ) — 1× per month (small metals included)
    • Recyclables (資源ごみ) — Cans, PET, glass, paper — varies by district
    • Oversized waste (粗大ごみ) — By appointment

    Kyoto is known for its historic machiya townhouse neighborhoods where narrow alleys make garbage collection challenging. If you live in central Kyoto, you may have a specific collection point designated by your machiya landlord.

    🌻 Nagoya (名古屋市)

    Nagoya has a 5-category system with some unique rules:

    • Burnable garbage (可燃ごみ) — 2× per week (Mon/Thu or Tue/Fri)
    • Non-burnable garbage (不燃ごみ) — 1× per month
    • Empty cans (空き缶) — 1× per week
    • Empty bottles and empty PET (空きびん・空きペット) — 1× per week
    • Paper and other resource garbage (古紙等資源ごみ) — 1× per week

    Nagoya requires the use of official Nagoya garbage bags (名古屋市指定ごみ袋) for burnable and non-burnable garbage. These must be purchased and are available in sizes 15L, 30L, and 45L at supermarkets and drug stores. The bags are yellow/cream colored and clearly marked.

    🛋️ Oversized Garbage (粗大ごみ / Sodai Gomi)

    Items larger than about 30–50cm in any direction are classified as oversized (bulky) garbage and cannot be put out with regular trash. You must schedule a pickup appointment and pay a fee.

    How to Dispose of Oversized Garbage

    1. Determine your fee. Look up the item on your city’s oversized garbage fee schedule online. Fees vary by item type and size.
    2. Purchase a garbage sticker (粗大ごみシール). Buy this at a convenience store (コンビニ), post office, or the city hall. Write your name and date on the sticker.
    3. Schedule a pickup. Call your city’s oversized garbage center or apply online. You’ll be given a specific date.
    4. Put it out on the pickup day. Place the item in front of your building or at the designated spot on the morning of collection. Attach the sticker prominently.

    Oversized Garbage Fees by City

    Item Tokyo (avg) Osaka Yokohama Fukuoka
    Single bed mattress ¥1,200–2,000 ¥1,200 ¥1,600 ¥1,500
    Sofa (2-seater) ¥2,000–4,000 ¥2,000 ¥2,400 ¥2,000
    Bicycle ¥1,000–2,000 ¥1,200 ¥1,600 ¥1,000
    Dining table ¥1,200–3,000 ¥1,200 ¥2,400 ¥1,500
    Wardrobe (large) ¥2,000–5,000 ¥2,400 ¥4,000 ¥2,500
    Tatami mat (per mat) ¥1,000–1,500 ¥1,200 ¥1,200 ¥1,000

    Alternatives to Oversized Garbage Pickup

    Rather than paying city fees, consider these options for large items in good condition:

    • Mercari / Junk Mail: Japan’s most popular second-hand apps. Easy to list furniture; buyers often arrange their own transport.
    • Jimoty (ジモティー): Free listing site for giveaways. You can give away furniture for free, and many people will come to pick it up.
    • IKEA/Nitori take-back: IKEA Japan has a buy-back service. Nitori accepts some furniture returns.
    • Recycle shops (リサイクルショップ): Shops like Hard Off, Book Off, and Second Street buy used furniture and electronics.
    • Private waste collection companies: For large volumes (e.g., clearing an entire apartment), private companies will haul everything away for a flat fee — typically ¥10,000–50,000.

    📺 Home Appliance Recycling Law (家電リサイクル法)

    Japan’s Home Appliance Recycling Law (家電リサイクル法, Kaden Risaikuru Ho) covers four specific categories of large electronics. These cannot be disposed of as regular oversized garbage — they require specialized recycling.

    The 4 Covered Categories

    Item Typical Recycling Fee How to Dispose
    Air conditioners (エアコン) ¥990–2,000+ Retailer/manufacturer collection
    TVs (テレビ) — CRT & flat panel ¥1,320–2,916 Retailer/manufacturer collection
    Refrigerators (冷蔵庫) ¥3,740–4,730 Retailer/manufacturer collection
    Washing machines (洗濯機) ¥2,530–3,300 Retailer/manufacturer collection

    How to use the recycling law:

    1. Contact the retailer where you bought the appliance (or any appliance retailer like Yamada Denki, Bic Camera, or Yodobashi Camera). They are legally required to accept old appliances.
    2. Alternatively, contact the manufacturer directly.
    3. You can also drop items off at a designated recycling collection point — your city hall website lists locations.
    4. Pay the recycling fee (リサイクル料金) — this is separate from any transport fee the retailer may charge.

    PC Recycling (パソコン)

    PCs are covered by a separate law. Manufacturers marked with the PC recycling mark (PCリサイクルマーク) will collect their own products for free. For older machines without this mark, you’ll pay ¥3,000–5,000 for disposal. Alternatively, many municipalities have designated PC collection days, and some 100-yen shops and electronics retailers accept small electronics for recycling.

    🔋 Batteries, Medicines, and Hazardous Items

    These require special handling and cannot go in regular garbage:

    Batteries (電池)

    • Single-use batteries (乾電池): Do NOT put in burnable or non-burnable garbage (risk of fire in collection trucks). Most supermarkets, drug stores, and electronics shops have free collection boxes. Some wards collect them with non-burnable garbage on specific days — check locally.
    • Rechargeable batteries and lithium batteries: Bring to electronics stores (Yodobashi, Bic Camera) or to JBRC collection points. These must never go in garbage or oversized collection — lithium batteries have caused fires in garbage trucks.
    • Car batteries: Return to the store where you buy a new one, or take to a gas station.

    Medicines (薬)

    • Unused/expired medicines: Do NOT flush down the toilet (water pollution risk). Bring to a pharmacy (薬局) — many accept returns. Some cities have medicine collection at city hall or designated collection points.
    • Liquid medicines should be solidified (absorbent material) before disposal in burnable garbage if no collection point is available.

    Other Hazardous Items

    • Mercury thermometers and fluorescent lights: These contain mercury — bring to a collection point. Most cities have special collection events (特別回収) a few times a year.
    • Paint, chemicals, pesticides: Never pour down the drain. Many cities have specific collection events — check your ward’s calendar. Some hardware stores accept unused paint.
    • Gas cylinders (ガス缶/カセットボンベ): Must be completely empty before disposal. Puncture the cap to release remaining gas, then put in non-burnable or small metal garbage (city-specific).
    • Fire extinguishers: Not regular garbage. Contact a certified disposal company or the fire extinguisher manufacturer.

    🏠 Move-In & Move-Out Garbage Guide

    Moving is one of the most garbage-intensive events in daily life, and Japan has specific rules for disposal when you’re relocating.

    When Moving In

    • Register with your ward office first. You cannot legally use the local garbage station until you’ve registered as a resident (住民登録). This usually happens within 14 days of moving in.
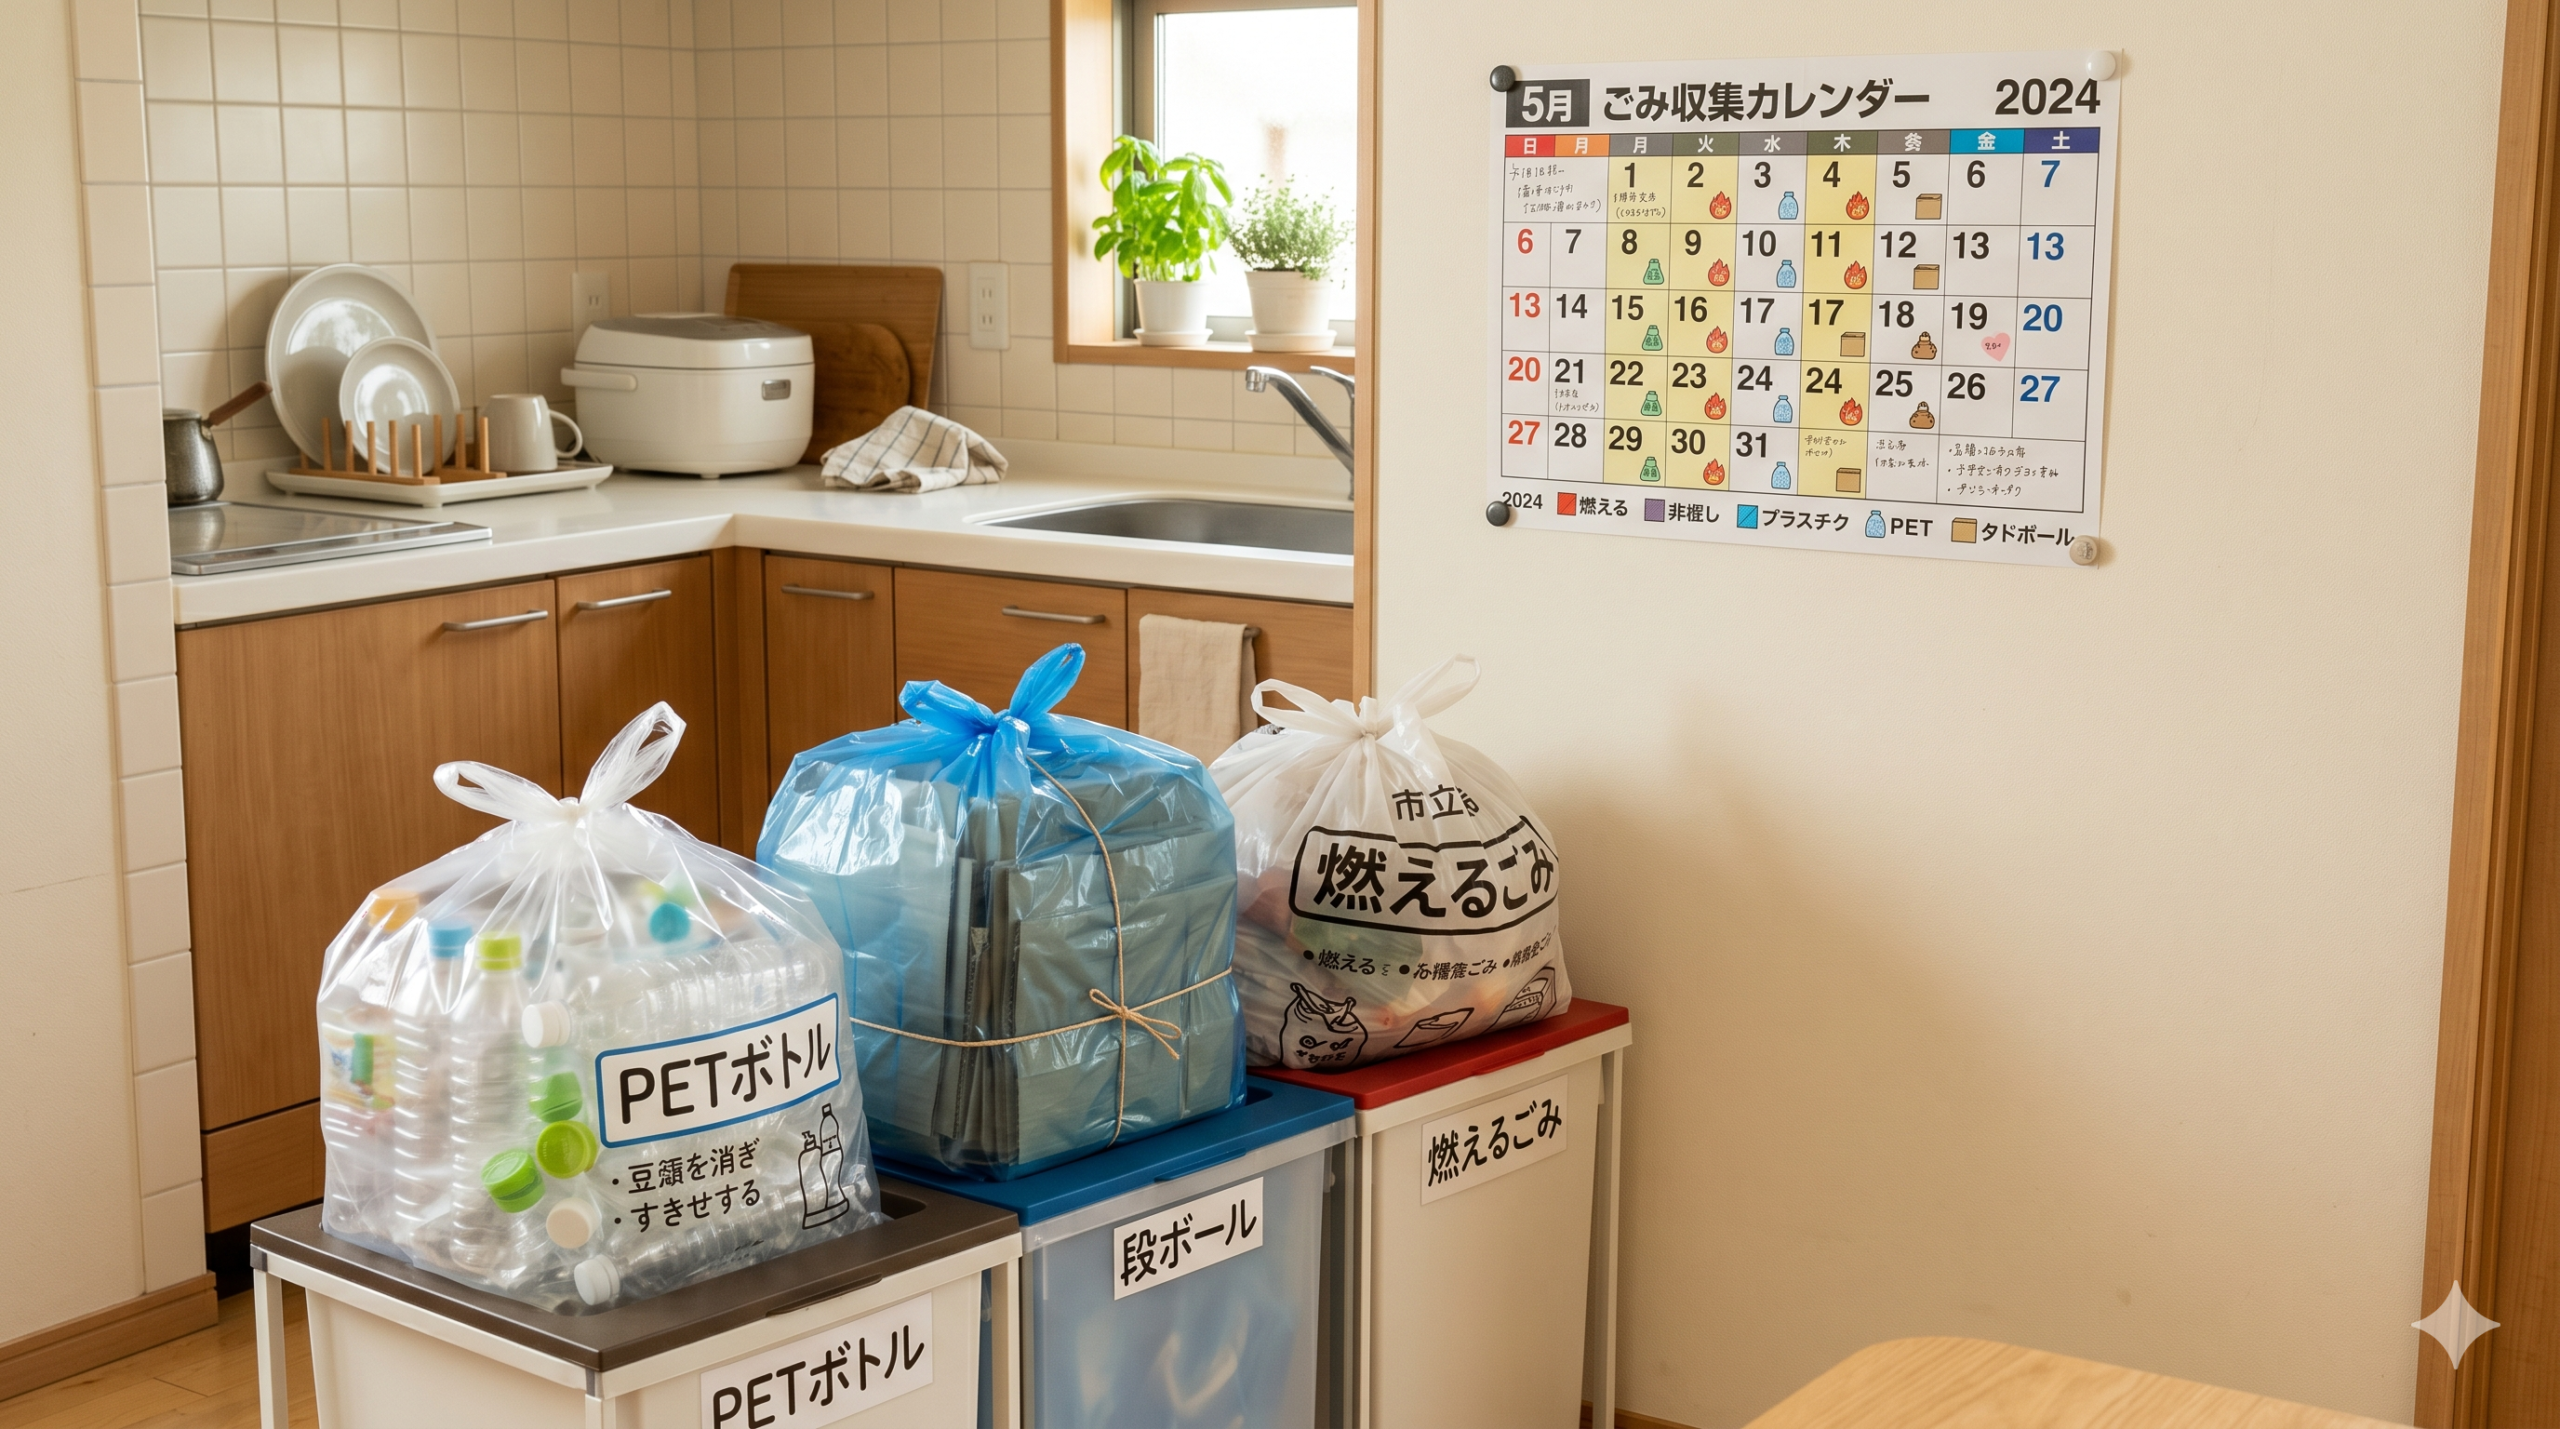
    • Get your garbage schedule. Your ward office or building manager will give you a garbage calendar (ゴミ収集カレンダー) — a colored chart showing what category is collected on which day. This is your bible for the next few years.
    • Get official bags if required. Some cities (Nagoya, Fukuoka, etc.) require official bags. Buy these before your first garbage day.
    • Locate your garbage station. Ask your building manager or landlord where the nearest communal garbage spot is. In apartments, it’s often in the basement or car park.
    • Cardboard from moving boxes: Break down and bundle with string for paper recycling. Don’t put it all out at once — it may not all fit, or the collection schedule may not align. Ask your landlord if the building has a cardboard disposal area.

    When Moving Out (引っ越し時のごみ処理)

    • Clear out before the move. Ideally, start reducing garbage 2–3 weeks before the move date so you’re not stuck with a mountain of trash on moving day.
    • Large furniture and appliances: Schedule oversized garbage pickup (粗大ごみ) at least 2–3 weeks in advance — appointment slots can be scarce. Or sell on Mercari/Jimoty.
    • Do NOT put garbage out after you’ve unregistered. Once you’ve completed your move-out registration (転出届), you’re technically no longer a resident of that ward and cannot use the local garbage collection. The timing can be tricky — coordinate with your landlord.
    • Clean the apartment. Japan expects apartments to be returned in pristine condition. Don’t leave ANY garbage behind — your landlord can charge you for removal fees.
    • Ask about extra collection. Some wards offer a special “moving garbage” collection or allow you to bring extra bags during a defined period. Call your ward office to ask.
    Moving Day Tip: Hire a moving company (引越し業者) that offers a “garbage disposal service” add-on. Many companies like Kuroneko Yamato Home Convenience and Sagawa will haul away old furniture and electronics as part of the move package — often cheaper than handling disposal yourself.

    🏘️ Neighborhood Associations and Garbage Stations

    In most Japanese residential areas, garbage collection is managed through a community system centered around the neighborhood association (町内会, chōnaikai). Understanding how this works will save you from awkward encounters with your neighbors.

    What is the Chōnaikai?

    The chōnaikai is a voluntary neighborhood organization that handles community tasks like cleaning, festival organization, and — critically — garbage station management. As a resident (including foreigners), you may be expected to:

    • Join the chōnaikai and pay a small monthly fee (typically ¥200–500/month)
    • Take turns on “garbage station duty” (ゴミ当番) — usually once every few months, meaning you arrive early on collection morning, open the net over the garbage pile, oversee the pickup, and clean up afterward
    • Help maintain the garbage station area (sweeping, washing)

    Joining is technically voluntary, but refusing can lead to social friction. Most chōnaikai are welcoming to foreign residents and will explain the rules in simple Japanese (and sometimes English).

    The Crow Problem (カラス対策)

    Jungle crows (ハシブトガラス) are intelligent, resourceful, and a major urban pest in Japan. They tear open garbage bags looking for food scraps. To counter this:

    • Garbage stations are covered with nets (防鳥ネット) that are spread over the pile before collection and removed afterward
    • Never put food-containing bags on top of the pile — tuck them underneath
    • Some neighborhoods use yellow mesh bags that crows reportedly find harder to see through
    • Do not leave garbage out the night before — crows are active at dawn

    High-Rise Apartments (マンション)

    In larger condominium buildings, garbage collection is typically managed by the building management company (管理会社). Usually there’s a dedicated garbage room (ゴミ置き場) on the ground floor or basement. Rules:

    • You can deposit garbage 24/7 (or during designated hours — check your building rules)
    • Separate bins are provided for each category
    • Some buildings have automated garbage collection systems (ゴミ圧縮装置)
    • You don’t need to join a chōnaikai in most condominiums

    🚫 Top 10 Mistakes Foreigners Make with Japanese Garbage

    These are the most common errors that lead to garbage being rejected (left behind with a red sticker) or triggering neighbor complaints:

    ❌ Mistake #1: Putting garbage out on the wrong day
    Japan runs a very tight collection schedule. Burnable garbage day doesn’t mean you can put out non-burnable items “just this once.” Collections happen fast, and rejected bags sit until the next collection day.
    ❌ Mistake #2: Not rinsing bottles and containers
    Food residue in recyclables contaminates entire batches. A bottle with soy sauce residue can cause a whole bin of glass to go to incineration instead of recycling. Rinse everything.
    ❌ Mistake #3: Putting garbage out too early
    In many neighborhoods, putting garbage out the night before is prohibited. Not only do crows ravage the bags, but it’s considered antisocial. Put garbage out on collection morning, before 8:00–8:30 AM.
    ❌ Mistake #4: Using opaque or colored bags
    Many municipalities require semi-transparent bags so collectors can verify the contents. Using an opaque black trash bag (common in Western countries) will likely result in your garbage being rejected.
    ❌ Mistake #5: Putting batteries in regular garbage
    This is actually a fire hazard. Lithium batteries and even regular alkaline batteries can cause fires in garbage collection trucks and processing facilities. Use dedicated battery collection boxes.
    ❌ Mistake #6: Leaving caps on PET bottles
    The cap must be removed (it’s a different type of plastic). The label must also be peeled off. Many collection points will reject PET bottles that still have caps or labels.
    ❌ Mistake #7: Not flattening cardboard
    Cardboard must be broken down flat and bundled with string (not put in a bag). Un-flattened boxes take up too much space and won’t be collected.
    ❌ Mistake #8: Throwing away large appliances as regular garbage
    Refrigerators, washing machines, TVs, and air conditioners are covered by the Home Appliance Recycling Law and cannot be put out as regular or oversized garbage. Many people abandon appliances on the street — this is illegal and you can be fined.
    ❌ Mistake #9: Dumping garbage at a station you don’t belong to
    Garbage stations are for use by residents of that specific neighborhood. Using a random station because it’s more convenient is considered improper and can trigger complaints.
    ❌ Mistake #10: Not labeling sharp or dangerous items
    Knives, razor blades, and broken glass must be wrapped in thick paper and labeled 危険 (kiken, “danger”) or ガラス (garasu, “glass”) for the safety of collection workers.

    📱 Apps and Resources to Help

    These tools make navigating Japan’s garbage rules much easier, especially when you’re starting out:

    City-Specific Official Apps

    • Tokyo Gomi (東京ごみ) — Available from each Tokyo ward. Look for your ward’s name in the App Store (e.g., “新宿区ごみ分別”). Shows collection calendars, item category search, and pickup schedule reminders.
    • Yokohama Gomi Navi (横浜市ごみ・資源物の分け方・出し方) — Yokohama City’s official app. Has a search function where you type in any item and it tells you which of the 10 categories it belongs to, and when it’s collected.
    • Osaka City Gomi App — Available as “大阪市ごみ分別なび.” Features include: collection day reminders by district, item categorization, and a multilingual FAQ.
    • Fukuoka City Gomi Calendar — Search “福岡市ごみ分別” for the city’s official app and web resources.

    National Resources

    • 5374.jp — A universal garbage schedule site that works for many municipalities across Japan. Enter your postal code and get your schedule. Interface is in Japanese but highly intuitive.
    • Sayonara Gomi (さようならゴミ) — Crowd-sourced app available for some cities. Useful for understanding local nuances.
    • Your local city hall website — Look for the 生活・環境 (lifestyle/environment) section. Many larger cities now offer garbage guides in English, Chinese, Korean, and other languages.
    • The Japan Garbage Disposal Guide (多言語生活情報) — Published by CLAIR (Council of Local Authorities for International Relations). A multilingual guide covering garbage basics across all of Japan.

    Useful Japanese Vocabulary for Garbage

    Japanese Romaji Meaning
    ゴミ / ごみGomiGarbage / trash
    可燃ごみKanen gomiBurnable garbage
    不燃ごみFunen gomiNon-burnable garbage
    資源ごみShigen gomiRecyclable resources
    粗大ごみSodai gomiOversized/bulky garbage
    燃えるごみMoeru gomiBurnable garbage (alt. term)
    ペットボトルPET bottoruPET plastic bottles
    ダンボールDanbōruCardboard
    収集日Shūshū biCollection day
    指定袋Shitei fukuroOfficial designated garbage bag
    ゴミ置き場Gomi okibaGarbage station/spot
    危険KikenDanger (label for sharp items)

    ❓ Frequently Asked Questions

    Here are the questions expats ask most about Japan’s garbage system:

    Q: My garbage was rejected with a red sticker. What do I do?

    Take the bag home. Check what was wrong — the sticker usually has a checkbox indicating the problem (wrong day, wrong bag, incorrect sorting, etc.). Re-sort the items correctly. Most buildings have a notice board explaining common mistakes. If the sticker is in Japanese and you can’t read it, ask your building manager to translate.

    Q: Can I get garbage information in English?

    Yes. Many city halls provide multilingual garbage guides. Tokyo Metropolitan Government, Yokohama City, and Osaka City all have English-language garbage information on their websites and at the ward office. Also check with your local International Exchange Center (国際交流センター) — they often provide translated garbage calendars for foreigners.

    Q: Is there a fine for improper garbage disposal?

    Yes, technically. Under Japan’s Waste Disposal and Public Cleansing Act, illegal dumping (不法投棄) can result in fines up to ¥1 billion for businesses and ¥5 million for individuals, plus imprisonment. In practice, most enforcement for residential violations is handled through community pressure rather than formal fines — your garbage is left behind and neighbors will talk. However, for major violations like abandoning appliances, surveillance cameras are now common and actual fines have been issued.

    Q: What if I’m not sure which category an item belongs to?

    Use your city’s garbage categorization tool — most city websites and apps have a search function where you type in the item name and it tells you the category. If the item isn’t in the database, default to burnable garbage (for items that can catch fire) or non-burnable (for items that can’t). When truly unsure, contact your ward office — they have garbage hotlines and are genuinely helpful.

    Q: Do I have to buy official garbage bags?

    It depends on your city. Nagoya, Fukuoka, and some wards of other cities require official designated bags (指定袋). Tokyo wards, Osaka (for most categories), and many other cities accept any semi-transparent or transparent bag. Check your local rules — the garbage calendar from your ward office will specify. Official bags are sold at supermarkets, convenience stores, and drug stores.

    Q: What do I do with used cooking oil?

    Never pour cooking oil down the drain — it clogs pipes and pollutes waterways. Options: (1) Let it solidify and dispose as burnable garbage — either use a solidifying agent (凝固剤, available at 100-yen shops) or absorb with newspaper/cardboard. (2) Many supermarkets and convenience stores have cooking oil collection boxes for recycling into biodiesel fuel — look for the yellow drop-off containers, especially at AEON stores. (3) Cooking oil can be taken to some city-designated collection points.

    Q: How do I dispose of a microwave or small appliance?

    Small kitchen appliances (microwaves, toasters, electric kettles) are typically oversized garbage (粗大ごみ) if larger than 30–50cm. Contact your city’s oversized garbage center to schedule pickup. If the appliance is in working condition, you can donate it to a recycle shop (リサイクルショップ), sell it on Mercari, or give it away on Jimoty.

    Q: Can I throw away medicine down the toilet?

    No — flushing medicine pollutes waterways and has been linked to antibiotic-resistant bacteria in rivers. Bring unused or expired medicines to a pharmacy (薬局). Many pharmacies and some city halls have medicine collection boxes. In a pinch, you can mix liquid medicines with coffee grounds or sawdust to deactivate them, then dispose as burnable garbage — but please use a collection point whenever possible.

    Q: What happens to Japan’s incinerated garbage?

    Japan’s modern incinerators are remarkably clean — equipped with advanced exhaust filters and emission controls. The heat generated is used to produce electricity and hot water for nearby buildings. The residual ash is used in construction materials (road base, land reclamation). Tokyo’s landfill in Tokyo Bay (夢の島) was created this way. This is why Japan can maintain much smaller landfills than most developed countries.

    Q: Are there collection points for clothes and textiles?

    Yes! Rather than putting old clothes in burnable garbage, consider: (1) Clothing donation boxes — many supermarkets, shopping centers, and city halls have drop-off boxes for used clothes. (2) Recycle shops — shops like 2nd Street, Book Off, and Treasure Factory buy good-condition clothes. (3) Clothing swaps — many expat communities organize regular clothing swaps. (4) H&M and Uniqlo both have in-store clothing recycling programs in Japan. Only dispose of truly worn-out textiles as burnable garbage.

    🌿 Conclusion: Garbage is a Window into Japanese Culture

    Japan’s meticulous garbage sorting system can be frustrating at first — but it reflects something deeper about Japanese culture: a commitment to collective responsibility, environmental sustainability, and consideration for others. Once you understand the why behind the rules, the how becomes much easier to follow.

    With this guide, you have everything you need to navigate Japan’s garbage system confidently. The key steps:

    1. Get your garbage calendar from your ward office or building manager
    2. Download your city’s official garbage app
    3. Buy official bags if required (Nagoya, Fukuoka, etc.)
    4. Rinse all recyclables before disposal
    5. Never put batteries, large appliances, or hazardous items in regular garbage
    6. When in doubt, ask your neighbors or call the ward office

    And remember — even long-term residents sometimes get things wrong. Nobody will judge you for asking questions. Good luck with your sorting! ♻️

    📥 Japan Expat Starter Kit 2026

    Everything you need to know about living in Japan — banking, healthcare, housing, Suica, taxes & more. 60+ pages of practical guides in one PDF.

    📥 Get the Guide — $19

    🇯🇵 Travel & Life Essentials for Japan

    Hand-picked gear to make your time in Japan easier. Available on Amazon US & Amazon Japan.

    🔋 Portable charger

    A must for long days of sightseeing and photos.

    View on Amazon (US)View on Amazon Japan

    🔌 Travel plug adapter

    Japan uses Type A outlets. Bring the right adapter.

    View on Amazon (US)View on Amazon Japan

    🎧 Translation earbuds

    Real-time translation to talk without barriers.

    View on Amazon (US)View on Amazon Japan

    As an Amazon Associate, Japan Life Lab earns from qualifying purchases.

  • Japan Budget Travel Guide 2026: How to Visit Japan for Under $50/Day

    Japan Budget Travel Guide 2026: How to Visit Japan for Under $50/Day

    Can You Really Travel Japan on a Budget in 2026?

    Japan has a reputation for being expensive — but that reputation is outdated. While Tokyo can rival New York or London for luxury spending, savvy travelers can comfortably explore Japan for $40–$60 per day, and budget backpackers can push this down to $30–$35. The strong USD/EUR vs. JPY rate in 2026 makes Japan one of the best value destinations in Asia right now.

    This guide breaks down everything: where to sleep cheap, where to eat well for ¥500, how to get around without a ¥50,000 JR Pass, and which free activities beat the paid tourist traps. Follow this and Japan won’t just be affordable — it’ll be incredible.

    Your Daily Budget Breakdown

    CategoryBudget (¥)Budget ($)Mid-range ($)
    Accommodation¥2,500–3,500$16–23$50–90
    Food¥1,500–2,500$10–17$30–50
    Transport¥800–1,500$5–10$15–25
    Activities¥500–1,000$3–7$15–30
    Total¥5,300–8,500$35–57$110–195

    Budget Accommodation: Sleep Well for Under $25

    🏨 Capsule Hotels (¥2,500–4,000/night)

    Japan’s capsule hotels have evolved dramatically. Modern ones like First Cabin, Nine Hours, and Book and Bed Tokyo offer private pods with good ventilation, lockers, clean shared bathrooms, and a genuinely cool experience. Tokyo’s Shinjuku and Asakusa areas have the best selection. Book 2–3 weeks ahead for popular locations.

    Best budget capsule chains: First Cabin (upscale feel, ¥3,500–5,000), Nine Hours (minimalist design, ¥3,000–4,500), Manga Art Hotel (surrounded by manga, ¥3,000+)

    🛏️ Hostels (¥2,000–3,500/dorm)

    Japan’s hostel scene is excellent — clean, safe, and often in fantastic locations. K’s House (multiple cities), Khaosan (Tokyo/Kyoto), and Nui Hostel in Asakusa are legendary among budget travelers. Private rooms in hostels run ¥5,000–8,000, which still beats regular hotels. Always check Hostelworld or Booking.com for deals.

    🏯 Guesthouses & Ryokan on Budget

    Budget ryokan (traditional inns) exist! Look outside city centers — in areas like Yanaka (Tokyo), Fushimi (Kyoto outskirts), or Namba (Osaka) you can find tatami rooms with breakfast for ¥4,000–6,000. Japanican and Japanese Guest Houses websites specialize in these.

    🏕️ Manga Kissa (24-hour internet cafes)

    An authentic local experience: manga kissa offer private booths with reclining seats, unlimited drinks, showers at some locations, and fast internet for ¥1,200–2,000 for 8 hours overnight. Not glamorous, but genuinely cheap and central — used by Japanese salary workers who missed the last train. Look for “漫画喫茶” signs in any major city.

    Budget Food: Eat Amazingly for ¥1,500/Day

    🍙 Convenience Stores (Konbini) — Your Budget Best Friend

    7-Eleven, FamilyMart, and Lawson are not the sad gas station shops you know from home. Japan’s konbini sell genuinely delicious onigiri (¥130–180), hot foods like oden and chicken, fresh sandwiches, and prepared meals — all for ¥200–500 each. A full konbini breakfast (onigiri + coffee) costs ¥300–400. Dinner from konbini easily stays under ¥600.

    🍜 Gyudon & Ramen Chains (¥400–800)

    Japan’s chain restaurants are a budget traveler’s dream. Yoshinoya, Matsuya, Sukiya serve gyudon (beef rice bowl) from ¥387. Ichiran, Fuunji, Tenkaippin offer ramen for ¥700–900. Saizeriya is an Italian-ish chain where pasta dishes start at ¥299 — yes, really. These are not tourist restaurants; Japanese people eat here every day.

    🍱 Depachika & Supermarket Bargains

    Department store basement food halls (depachika) and regular supermarkets reduce prices by 20–50% after 7pm on prepared foods. Items marked with “割引” (discount) stickers are your target. A full bento that cost ¥600 becomes ¥300–400. This is normal shopping for Japanese people, not a secret tourist trick.

    🍶 Standing Bars (Tachinomi) ¥200–400/drink

    Standing bars (tachinomi bars) are where you drink cheaply without sitting — beer and highballs from ¥200, small bites from ¥100. Look for them around train stations, especially in Osaka’s Namba area and Tokyo’s Yurakucho under the train tracks. Happy hour at izakayas (5–7pm) often offers drinks for ¥200.

    Budget Transport: Skip the Expensive JR Pass

    🚆 IC Cards (Suica/Icoca) — Essential

    Load a Suica or ICOCA card and use it for all local trains and buses. The per-ride cost is minimal compared to buying individual tickets, and you can use it at konbini too. A day of city exploration typically costs ¥800–1,200 in train fares. Always cheaper than taxis.

    🚌 Highway Buses (Night Buses)

    The JR Pass at ¥50,000+ is rarely worth it for budget travelers on 1–2 week trips. Instead, use highway night buses between cities: Tokyo→Osaka from ¥3,500–5,000 (vs. ¥13,000+ shinkansen), Osaka→Kyoto local train ¥570, Tokyo→Kyoto discount bus from ¥4,000. Willer Express and JR Bus are the main operators. Bonus: you save a night’s accommodation cost on overnight routes.

    ✈️ Domestic Flights (LCCs)

    For longer distances (Tokyo to Fukuoka, Osaka to Sapporo), LCCs like Peach Aviation and Jetstar Japan frequently offer fares of ¥3,000–6,000 booked 3–4 weeks ahead. Cheaper than shinkansen and sometimes faster door-to-door when airports are well-connected.

    🚲 Cycling

    Many Japanese cities have excellent cycling infrastructure. Rent-a-Cycle in Kyoto costs ¥1,000/day and lets you cover the famous sites (Fushimi Inari, Arashiyama, Philosopher’s Path) without paying bus fares. In flat cities like Hiroshima or Nara, a bike is the single best way to travel.

    Free & Cheap Activities (Under ¥1,000)

    ⛩️ Shrines & Temples (Free or ¥200–500)

    Most Shinto shrines are completely free to enter — you just walk in. This includes famous ones like Meiji Jingu (Tokyo), Fushimi Inari (Kyoto, free and open 24/7), and Itsukushima (Miyajima, free outside the main hall). Buddhist temple main halls usually charge ¥300–600 to enter, but temple grounds are often free.

    🌳 Parks & Gardens

    Shinjuku Gyoen: ¥500 for one of Tokyo’s most beautiful gardens. Ueno Park: free, with multiple museums. Maruyama Park in Kyoto: free, excellent for cherry blossom season. Osaka Castle park: free (castle tower ¥600). These beat expensive observation decks and tourist attractions.

    ♨️ Public Sento & Onsen (¥500–1,200)

    Skip the tourist onsen resorts (¥2,000–3,000) and use neighborhood sento (public bathhouses) for ¥500–750. Every Japanese neighborhood has one. Bring your own towel (or rent for ¥100), soap, and shampoo. An authentic experience locals actually use daily.

    🎌 Day Trips from Major Cities

    From Tokyo: Nikko (¥2,700 return by local train), Kamakura (¥1,400 return), Hakone (day pass ¥5,700 covers multiple transport modes). From Osaka: Nara (¥1,130 return on Kintetsu), Himeji (¥2,820 return by shinkansen or ¥1,400 by local). Nara is particularly great for budget travelers — deer park is free, temples are walkable, and lunch is cheap.

    Top Money-Saving Tips for Japan 2026

    • Travel in shoulder season: March (pre-cherry blossom) and October-November offer great weather without peak prices. Avoid Golden Week (late April–early May) and O-Bon (mid-August).
    • Use cashback credit cards: Japan is increasingly cashless. Cards with no foreign transaction fees (Wise, Revolut) save 2–3% on every purchase.
    • Buy a pocket WiFi or eSIM: Staying connected lets you navigate via Google Maps instead of buying tourist transport cards. Airalo eSIM from ¥800/week is excellent value.
    • Eat lunch specials (teishoku/lunch set): Japanese restaurants often have lunch sets for ¥800–1,200 that would cost ¥2,000+ at dinner. Always eat your main meal at lunch.
    • Get the Osaka Amazing Pass or Tokyo 24hr Metro Pass: If you’re doing multiple attractions in one city in one day, these passes pay for themselves quickly.
    • Download Google Translate with Japanese offline pack: Ordering from Japanese-only menus and navigating station signs becomes trivial.

    7-Day Japan Budget Itinerary ($350 Total)

    DayLocationAccommodationEst. Daily Cost
    1Tokyo (Asakusa)K’s House Tokyo ¥3,000$45
    2Tokyo (Shinjuku/Harajuku)Same hostel ¥3,000$40
    3Kamakura Day TripBack to Tokyo ¥3,000$42
    4Night bus → KyotoBus ¥3,500 (saves hotel!)$38
    5Kyoto (temples/Fushimi Inari)Khaosan Kyoto ¥2,800$43
    6Nara Day Trip + OsakaOsaka capsule ¥3,200$48
    7Osaka (Dotonbori/food tour)$42
    Total for 7 Days~$298

    ✈️ Cheapest ways to get around Japan

    Domestic flights on LCCs are often cheaper than the bullet train, and overnight buses save you a night’s accommodation too. Compare and book both online:

    Compare cheap flights (Travelist) → Book night buses (Airtrip) →

    FAQ: Budget Travel Japan 2026

    Is Japan affordable for budget travelers?

    Yes — especially in 2026 with the current yen exchange rate. Budget travelers can comfortably get by on $40–50/day covering accommodation, food, transport, and activities. Backpackers can push this to $30–35 by using konbini for meals and capsule hotels/hostels.

    What’s the cheapest way to get between Tokyo and Osaka?

    Highway night buses (¥3,500–5,500) are the cheapest option, and they save a night of accommodation costs. Budget flights from Peach or Jetstar can be cheaper if booked early. The shinkansen (¥13,000+) is fastest but most expensive.

    Do I need to book accommodation far in advance?

    For cherry blossom season (late March–April) and Golden Week, book 2–3 months ahead for budget options. Otherwise, 2–4 weeks is usually sufficient for hostels and capsule hotels. Flexibility in timing dramatically increases your options.

    Is Japan safe for budget solo travelers?

    Extremely safe. Japan consistently ranks among the world’s safest countries. Solo travelers, including women, regularly report feeling completely comfortable at all hours in all major cities. This is a genuine strength of Japan travel.

    📥 Japan Expat Starter Kit 2026

    Complete PDF guide: banking, transport, housing, daily life tips & more

    📥 Get the Guide — $19

    🇯🇵 Travel & Life Essentials for Japan

    Hand-picked gear to make your time in Japan easier. Available on Amazon US & Amazon Japan.

    🔋 Portable charger

    A must for long days of sightseeing and photos.

    View on Amazon (US)View on Amazon Japan

    🔌 Travel plug adapter

    Japan uses Type A outlets. Bring the right adapter.

    View on Amazon (US)View on Amazon Japan

    🎧 Translation earbuds

    Real-time translation to talk without barriers.

    View on Amazon (US)View on Amazon Japan

    As an Amazon Associate, Japan Life Lab earns from qualifying purchases.

  • How to Buy Japanese Fashion from Abroad 2026: Buyee, Amazon Japan & More

    How to Buy Japanese Fashion from Abroad 2026: Buyee, Amazon Japan & More

    📝 AI-Assisted Content Notice
    This article was created with AI writing assistance. Service details and pricing are verified by the Japan Life Lab editorial team.

    You’ve fallen down the rabbit hole. You’ve been watching Japanese street fashion videos, obsessing over UNIQLO Japan exclusives, and stalking GU’s Instagram for pieces that never make it to your country. You want it. But how do you actually buy it from abroad?

    The good news: it’s never been easier to shop Japanese fashion internationally. Between proxy services, Amazon Japan, and brands expanding global shipping, your options are extensive. The bad news: each method has catches — shipping fees, payment friction, size restrictions, customs costs. This guide cuts through the confusion so you can shop smart.

    Method 1: Buy Directly from Japanese Brand Websites

    The easiest route when it works. Several major Japanese fashion brands now ship internationally from their own sites.

    UNIQLO Global

    UNIQLO’s international site (uniqlo.com) ships to most countries. The selection is solid but deliberately curated — Japan-exclusive colorways and limited collabs often don’t appear here. If you want the full Japan lineup, you’ll need a different method.

    • Ships to: US, EU, Australia, most of Asia, and more (60+ countries)
    • Payment: Major credit cards, PayPal
    • Shipping cost: Free over a threshold (~$50–$75 depending on region)
    • Returns: Available in most markets
    💡 Pro tip: Create a Japanese UNIQLO account at uniqlo.com/jp to browse the full Japan catalog. You can see items and colorways not available on the global site. Then use Buyee to order them.

    Muji Global

    Muji ships internationally via muji.com and has stores across Europe, North America, and Asia. The global selection is comprehensive for clothing — most core items are available.

    • Ships to: Worldwide (store availability varies)
    • Payment: Major credit cards
    • Shipping cost: Varies by region, free over threshold

    Method 2: Amazon Japan (amazon.co.jp)

    Amazon Japan is massively underused by international shoppers. It carries an enormous range of Japanese fashion — UNIQLO, GU third-party sellers, and hundreds of Japanese brands — and ships to over 100 countries directly.

    How to Shop Amazon Japan Internationally

    • Go to amazon.co.jp and change the delivery address to your country
    • The site will filter to items eligible for international shipping
    • Pay with international credit cards — Visa, Mastercard, Amex all work
    • Prices display in JPY but your card converts automatically
    💡 Important: Not all items on Amazon Japan ship internationally. Look for the globe icon or “International Shipping Eligible” label. Third-party sellers may not ship abroad even if the main Amazon listing does.

    Method 3: Buyee — The Proxy Service for Everything Else

    This is the game-changer. Buyee is a Japan-based proxy shopping service that lets you buy from virtually any Japanese online store — including ones that don’t ship internationally at all — and forwards the package to you worldwide.

    How Buyee Works

    • You create a free Buyee account and get a Japanese delivery address
    • You shop normally on Japanese sites (GU, Zozotown, Mercari Japan, etc.)
    • Items ship to your Buyee warehouse address in Japan
    • Buyee consolidates your purchases and ships everything together to your country
    • You pay Buyee’s service fee (around 300–500 yen per item) plus international shipping

    What You Can Buy via Buyee

    Almost everything. The most popular uses among Japan fashion fans:

    • GU (gu-global.com) — the main reason most fashion fans use Buyee
    • Zozotown — Japan’s largest fashion marketplace, thousands of brands
    • Mercari Japan — secondhand Japanese streetwear and vintage at great prices
    • Beams, United Arrows, Ships — premium select shops
    • Rakuten Ichiba — massive variety including niche Japanese brands

    Buyee Cost Breakdown (Example Order)

    Cost ItemApprox. AmountNotes
    Item price (GU hoodie)¥2,990 (~$20)Actual product cost
    Buyee service fee¥300 per itemCan be reduced with membership
    Japan domestic shipping¥0–¥800Paid to store
    International shipping¥1,500–¥4,000Depends on weight and destination
    Customs/import duty0–20%Depends on your country

    Pro tip: Order multiple items at once to maximize shipping efficiency — Buyee consolidates packages, so the international shipping cost per item drops significantly with bigger orders.

    Method 4: Zozotown International

    Zozotown (zozo.jp) is Japan’s version of ASOS or Zalando — the dominant online fashion marketplace carrying hundreds of Japanese brands. They launched international shipping and it has improved significantly.

    • Ships to: Selected countries (US, UK, EU, Australia, parts of Asia)
    • Selection: Thousands of Japanese brands including niche labels
    • Payment: Credit cards, PayPal
    • Sizing: Japanese sizing throughout — measure carefully

    Method 5: Rakuten Global Market

    Rakuten’s global marketplace gives access to Japanese sellers who’ve opted in to international shipping. Good for mainstream brands, Japanese streetwear labels, and finding deals on popular items.

    • Ships to: Worldwide
    • Payment: Credit cards, PayPal
    • Best for: Branded items, traditional Japanese clothing (kimono, yukata)

    Customs and Import Duties: What to Expect

    CountryDuty-Free ThresholdImport Rate
    United States$8000–20% above threshold
    United Kingdom£13512% + 20% VAT above threshold
    EU (Germany/France etc)€15012% + local VAT above threshold
    AustraliaAUD $1,0005% + 10% GST above threshold
    CanadaCAD $20Varies by item type
    💡 Tip: US buyers have a huge advantage with the $800 duty-free threshold. You can order a substantial haul without paying any import duties — making Buyee particularly cost-effective from the US.

    Best Method by Brand

    BrandBest MethodNotes
    UNIQLOUNIQLO Global siteUse Buyee for Japan-exclusive items
    GUBuyee (only option)No international shipping from GU directly
    MujiMuji.com directGlobal site has good selection
    BeamsBuyee or ZozotownFull catalog via Buyee
    Secondhand/VintageBuyee via Mercari JapanBest prices on used Japanese streetwear

    Final Advice

    For most international Japan fashion shoppers, the ideal setup is simple: use UNIQLO Global and Muji.com for your basics (free shipping, easy returns), and use Buyee for everything else — GU, Zozotown, Mercari Japan, and any Japanese brand that doesn’t ship internationally. Buy multiple items per Buyee order to spread the shipping cost.

    Once you’ve done it once, you’ll wonder why you waited so long.

📖

0 guides available